Difference between revisions of "Matoya's Relict"
(→Bosses) |
m (→link= Porcine Porcelain: Mother Porxie: typo) |
||
| (36 intermediate revisions by 12 users not shown) | |||
| Line 4: | Line 4: | ||
| type = dungeon | | type = dungeon | ||
| level = 80 | | level = 80 | ||
| level-sync = 80 | |||
| ilvl = 470 | | ilvl = 470 | ||
| size = light | | size = light | ||
| time-limit = 90 | | time-limit = 90 | ||
| roulette = | | duty-finder = Dungeons (Shadowbringers) | ||
| tomestones = | | roulette = High-level Dungeons | ||
| tomestones = 70 poetics | |||
| entrance = The Dravanian Hinterlands | | entrance = The Dravanian Hinterlands | ||
| entrance-coordinates = 30.2, 18.2 | | entrance-coordinates = 30.2, 18.2 | ||
| req-quest = Like Master, Like Pupil | | req-quest = Like Master, Like Pupil | ||
| modes = duty support, trust, explorer | |||
| trust-exp = 2,365,600 | |||
| patch = 5.4 | | patch = 5.4 | ||
| release = shadowbringers | | release = shadowbringers | ||
}} | }} {{TOC limit|3}} | ||
==Duty Support== | |||
{{TOC limit|3}} | *Party member selection is available. | ||
{| {{STDT|pve align-left}} | |||
! | |||
! G'raha Tia | |||
! Alphinaud | |||
! Alisaie | |||
! Y'shtola | |||
|- | |||
| | |||
| [[File:DS G'raha Tia1.png]] | |||
| [[File:DS Alphinaud1.png]] | |||
| [[File:DS Alisaie1.png]] | |||
| [[File:DS Y'shtola2.png]] | |||
|- | |||
| '''Class''' | |||
| {{PLD}} {{WHM}} {{BLM}} All-Rounder | |||
| {{SCH}} Academician | |||
| {{RDM}} [[Red Mage]] | |||
| {{BLM}} Sorceress | |||
|- | |||
| '''Role''' | |||
| Any | |||
| Healer | |||
| DPS | |||
| DPS | |||
|} | |||
== | ==Objectives== | ||
# Arrive at the Claydot Cauldron: 0/1 | |||
# Clear the Claydot Cauldron: 0/1 | |||
# Arrive at the Clearnote Cauldron: 0/1 | |||
# Clear the Clearnote Cauldron: 0/1 | |||
# Arrive at the Kilnfire Cauldron: 0/1 | |||
# Defeat the [[Mother Porxie|mother porxie]]: 0/1 | |||
== | ==Enemies== | ||
* [[Exoray]] | |||
* [[Relict Werewood]] | |||
* [[Cave Mantis]] | |||
* [[Cave Tarantula Hawk]] | |||
* [[Spriggan Quarrier]] | |||
* [[Spriggan Stonebearer]] | |||
* [[Sonny of Ziggy]] | |||
* [[Mud Bubble]] | |||
* [[Cave Pugil]] | |||
* [[Cave Gelatin]] | |||
* [[Cave Opken]] | |||
* [[Cave Hropken]] | |||
* [[Icicle]] | |||
* [[Unfinished Nixie]] | |||
* [[Lava Phoebad]] | |||
* [[Relict Flan]] | |||
* [[Relict Licorice]] | |||
* [[Pyroduct Eldthurs]] | |||
* [[Relict Slime]] | |||
* [[Relict Syrup]] | |||
* [[Relict Bavarois]] | |||
* [[Relict Marshmallow]] | |||
* [[Relict Pudding]] | |||
* [[Molten Phoebad]] | |||
==Bosses== | ==Bosses== | ||
{{#ev:youtube|6K_P6VSfkTs| | {{#ev:youtube|czc979B71d8|350|right|MTQcapture Guide}} | ||
===[[File:Aggressive difficulty | {{#ev:youtube|6K_P6VSfkTs|350|right|Video Guide}} | ||
===[[File:Aggressive difficulty r5.png|link=]] [[Mudman (Enemy)|Mudman]]=== | |||
The key mechanic of this fight is the balls of mud you need to aim into the corners of the room. Make sure that when you're tethered to a ball, line yourself up so that the ball shoots through you and into a hole in one of the corners of the room. Keep your eye out for little mud men inside the holes, if you see one, make sure you aim away from THAT hole, as it won't get rid of your ball and you'll continue to take damage from it. | |||
''Abilities'' | |||
:'''Hard Rock''' - tankbuster, healers prepare and tanks pop some cooldowns. | |||
:'''Petrified Peat''' - basic targeted AOE, split up and don't overlap hitboxes. This will leave mud balls on the battlefield (read Peat Pelt). | |||
:'''{{action icon|Peat Pelt}}''' - tethers each player to one of the balls left on the field. Position yourself so the balls will shoot through you and into one of the holes (drains) on the edges of the battlefield. | |||
:* If you fail to lead a ball into a drain, then it will repeatedly roll into you, gaining size and dealing more damage with each roll. | |||
:* Later in the fight, this mechanic will repeat, but with mudmen blocking some of the drains. Avoid leading a ball into a mudman, as they will push the ball back with high damage that may one-shot you. | |||
:'''Brittle Breccia''' - frontal 270-degree attack in 3 waves. Stand near an AoE, then step into it as it resolves to avoid the remaining AoEs. | |||
:'''Stone Age''' is a room-wide AoE. | |||
:'''Falling Rock''' - stack, make sure you group up to share the damage. | |||
===[[File:Aggressive difficulty r6.png|link=]] Mother Porxie=== | ===[[File:Aggressive difficulty r5.png|link=]] [[Nixie]]=== | ||
The key mechanic of this fight is watching the sides of the room for the water pipes and standing where the water will not hit, as well as making sure you jump into one of the water sprouts that will shoot you up to the cloud where Nixie is singing during the "Singing in the Rain" phase. If you can do these two things, you'll be good as gold! | |||
''Abilities'' | |||
:'''Smash-Crash''' - cleaving tankbuster that targets the tank with four tethers in a plus shape. The tethers cannot be intercepted, so everyone except the tank needs to stay away from the tethers. | |||
:'''Shower Power''' - Nixie tethers to a wall, then makes 3 of the pipes on that wall glow. You need to stand in the lane that does not have a glowing pipe, to avoid the incoming water blast. | |||
:'''Singing in the Rain''' - Nixie retreats to a cloud and summons some '''Unfinished Nixie'''s that start casting. Water spouts will form around the room, which will knock players upward when touched. You need to stand on a water spout near the cloud to get knocked upward onto it, then defeat the Unfinished Nixies before they finish casting. | |||
:* After all the adds have been defeated, Nixie will cast '''{{action icon|Sea Shanty}}''' on the lower platform, killing anyone that is not standing on the cloud. | |||
:* If the adds are not defeated in time, Sea Shanty will instead target the entire room including the cloud, wiping the party. | |||
:* Note that the NPCs in Duty Support will not use the water spouts - they will move up to the cloud only once the player has done so. | |||
:'''Unnamed AOE Target''' is a basic targeted group AOE, and will overlap with previous mechanics. Just spread out to avoid excess damage. | |||
:'''Unnamed Water Spouts''' will just form around the room (as they did during Singing in the Rain), and will overlap with previous mechanics. Avoid these as to not get stuck in place and get hit by other attacks. | |||
===[[File:Aggressive difficulty r6.png|link=]] Porcine Porcelain: [[Mother Porxie]]=== | |||
The key mechanics in the fight involve running against the wind immediately as you dodge incoming AOEs (otherwise you'll fall into a kill zone), and making sure when you see the room-wide "wind arrows" with a circle safe zone in the middle of the room, you're standing close to Mother Porxie, as she'll blow you back before denoting a room-wide AOE that does massive damage. | |||
:'''Tender Loin''' - room-wide AOE spell that does moderate damage. Healers be ready to AOE heal after it's cast | |||
:'''Huff and Puff''' - room-wide gust combined with a room-wide donut AOE. Stand close to Mother Porxie (not in the safe zone circle), as she'll blow you into the safe zone, before immediately denotating the room-wide AOE. | |||
:'''Meat Mallet''' - proximity AoE, get to the opposite end of the arena to reduce damage and prepare for the next mechanic. This is immediately followed by Barbecue. | |||
:'''Barbecue''' - The boss places a death zone in front of her, and starts pulling players towards her with wind, while various AoEs spawn. Keep running away from the boss while avoiding AoEs, as the wind will gradually increase in strength. | |||
:* You cannot use any actions during this attack (including {{action icon|Sprint}}), so continue holding away from the boss in order to not die! | |||
;*Any players that end up in the death zone will be hit by '''To a Crisp''', and instantly die. | |||
:'''Hidden Huff and Puff''' - exactly like Huff and Puff, but the wind visual cue is not visible at ground level. Instead, a wind sprite will be summoned - when killed, it will explode and launch the party over the haze in the room, revealing Mother Porxie's position and the direction of the wind. Memorize this, and upon landing, position such that the wind will push you into the safe zone. Mother Porxie will reappear just a moment or so before the attack finally finishes charging. | |||
:'''Open Flame''' - basic targeted AOE ability, don't overlap them to avoid excess damage | |||
:'''Minced Meat''' - tankbuster single target spell, cooldowns and healing at the ready! | |||
==Loot== | ==Loot== | ||
===[[File:Silver Coffer (small).png|link=]] [[Mudman]]=== | {{see also|Heirloom Armor|Heirloom Accessories}} | ||
{{Drops list|Mudman}} | ===[[File:Silver Coffer (small).png|link=]] [[Mudman (Enemy)|Mudman]]=== | ||
{{Drops list|Mudman (Enemy)}} | |||
===[[File:Silver Coffer (small).png|link=]] [[Nixie]]=== | ===[[File:Silver Coffer (small).png|link=]] [[Nixie]]=== | ||
{{Drops list|Nixie}} | {{Drops list|Nixie}} | ||
===[[File: | ===[[File:Gold Coffer (small).png|link=]] [[Mother Porxie]]=== | ||
*{{Item icon|Mother Porxie Card}} (Drops at a fixed rate.) | |||
{{Drops list|Mother Porxie}} | {{Drops list|Mother Porxie}} | ||
===Treasure Coffers=== | ===Treasure Coffers=== | ||
====Treasure Coffer 1 (X: 12.4 Y: 10.6)==== | ====[[File:Bronze Coffer (small).png|link=]] Treasure Coffer 1 (X: 12.4 Y: 10.6)==== | ||
{{Drops table header}} | {{Drops table header}} | ||
{{Drops table row|Heirloom Greaves of Fending}} | {{Drops table row|Heirloom Greaves of Fending}} | ||
{{Drops table row|Heirloom Greaves of Maiming}} | {{Drops table row|Heirloom Greaves of Maiming}} | ||
| Line 58: | Line 145: | ||
{{Drops table row|Heirloom Shoes of Casting}} | {{Drops table row|Heirloom Shoes of Casting}} | ||
{{Drops table row|Heirloom Shoes of Healing}} | {{Drops table row|Heirloom Shoes of Healing}} | ||
{{Drops table row|Heirloom | {{Drops table row|Heirloom Amulet of Fending}} | ||
{{Drops table row|Heirloom | {{Drops table row|Heirloom Amulet of Slaying}} | ||
{{Drops table row|Heirloom | {{Drops table row|Heirloom Amulet of Aiming}} | ||
{{Drops table row|Heirloom | {{Drops table row|Heirloom Amulet of Casting}} | ||
{{Drops table row|Heirloom | {{Drops table row|Heirloom Amulet of Healing}} | ||
{{Drops table row|Heirloom Ring of Fending}} | {{Drops table row|Heirloom Ring of Fending}} | ||
{{Drops table row|Heirloom Ring of Slaying}} | {{Drops table row|Heirloom Ring of Slaying}} | ||
| Line 77: | Line 164: | ||
{{Table footer}} | {{Table footer}} | ||
====Treasure Coffer 2 (X: 10.5 Y: 10.2)==== | ====[[File:Bronze Coffer (small).png|link=]] Treasure Coffer 2 (X: 10.5 Y: 10.2)==== | ||
{{Drops table header}} | {{Drops table header}} | ||
{{Drops table row|Heirloom Circlet of Fending}} | {{Drops table row|Heirloom Circlet of Fending}} | ||
| Line 103: | Line 190: | ||
{{Drops table row|Heirloom Necklace of Casting}} | {{Drops table row|Heirloom Necklace of Casting}} | ||
{{Drops table row|Heirloom Necklace of Healing}} | {{Drops table row|Heirloom Necklace of Healing}} | ||
{{Table footer}} | {{Table footer}} | ||
====Treasure Coffer 3 (X: 11.8 Y: 13.4)==== | ====[[File:Bronze Coffer (small).png|link=]] Treasure Coffer 3 (X: 11.8 Y: 13.4)==== | ||
{{Drops table header}} | {{Drops table header}} | ||
{{Drops table row|Heirloom Jacket of Fending}} | {{Drops table row|Heirloom Jacket of Fending}} | ||
| Line 128: | Line 208: | ||
{{Drops table row|Heirloom Trousers of Casting}} | {{Drops table row|Heirloom Trousers of Casting}} | ||
{{Drops table row|Heirloom Trousers of Healing}} | {{Drops table row|Heirloom Trousers of Healing}} | ||
{{Drops table row|Heirloom | {{Drops table row|Heirloom Amulet of Fending}} | ||
{{Drops table row|Heirloom | {{Drops table row|Heirloom Amulet of Slaying}} | ||
{{Drops table row|Heirloom | {{Drops table row|Heirloom Amulet of Aiming}} | ||
{{Drops table row|Heirloom | {{Drops table row|Heirloom Amulet of Casting}} | ||
{{Drops table row|Heirloom | {{Drops table row|Heirloom Amulet of Healing}} | ||
{{Drops table row|Heirloom Ring of Fending}} | {{Drops table row|Heirloom Ring of Fending}} | ||
{{Drops table row|Heirloom Ring of Slaying}} | {{Drops table row|Heirloom Ring of Slaying}} | ||
| Line 147: | Line 227: | ||
{{Table footer}} | {{Table footer}} | ||
====Treasure Coffer 4 (X: 11.7 Y: 11.1)==== | ====[[File:Bronze Coffer (small).png|link=]] Treasure Coffer 4 (X: 11.7 Y: 11.1)==== | ||
{{Drops table header}} | {{Drops table header}} | ||
{{Drops table row|Heirloom Earring of Fending}} | {{Drops table row|Heirloom Earring of Fending}} | ||
| Line 167: | Line 247: | ||
{{Drops table row|Piety Materia VII}} | {{Drops table row|Piety Materia VII}} | ||
{{Table footer}} | {{Table footer}} | ||
==Achievements== | |||
This duty is associated with the following [[achievements]]: | |||
{| {{STDT| mech1 sortable align-left}} | |||
{{achievement table header}} | |||
{{achievement table row|Mapping the Realm: Matoya's Relict}} | |||
|} | |||
==Images== | ==Images== | ||
===Gear Images=== | ===Gear Images=== | ||
[[File:Matoya's Relict Gear1.jpg|400px]] | [[File:Matoya's Relict Gear1.jpg|400px]] | ||
===Dungeon Images=== | ===Dungeon Images=== | ||
<gallery mode="packed"> | <gallery mode="packed" heights=200px> | ||
Matoya's Relict intro.png | |||
File:Matoya's Relict1.jpg | File:Matoya's Relict1.jpg | ||
File:Matoya's Relict2.jpg | File:Matoya's Relict2.jpg | ||
Matoya's Relict boss.png | |||
</gallery> | </gallery> | ||
== | ===Other Images=== | ||
<gallery mode="packed" heights=300px> | |||
Matoya's Relict dialogue.jpg|Dungeon Dialogue Infographic (credits: [https://www.reddit.com/user/TrustInsighters TrustInsighters]) | |||
</gallery> | |||
{{Duties nav|dungeon}} | {{Duties nav|dungeon}} | ||
Latest revision as of 19:05, 25 February 2025
Matoya's Relict

- Level
- 80 (Sync: 80)
- Item Level
- 470
- Difficulty
- Normal
- Party size
- Light Party
4 man • 1 1
1  2
2 
- Unsyncing
- Allowed
- Time limit
- 90 minutes
- Duty Finder
- Dungeons (Shadowbringers)
- Roulette
- High-level Dungeons
- Tomestones
 70
70 - Req. quest
 Like Master, Like Pupil
- Entrance
- The Dravanian Hinterlands (X:30.2, Y:18.2)
- Modes
- Duty Support, Trust, Explorer
- Trust EXP
- 2,365,600
- Patch
- 5.4
“The Makers' Quarter was once home to some of the finest crafters Eorzea had ever seen, but it has lain in forgotten ruin since the Sharlayan exodus. It is there, hidden amidst overgrown foliage, that the entrance to the former workshop of the Archon Matoya can be found. Seeking to create a familiar that creates familiars, you throw open the doors and step into the "moldy old hole"─the first souls to do so in decades...
— In-game description
Matoya's Relict is a level 80 dungeon introduced in patch 5.4 with Shadowbringers.
Duty Support
- Party member selection is available.
| G'raha Tia | Alphinaud | Alisaie | Y'shtola | |
|---|---|---|---|---|

|

|

|

| |
| Class | ||||
| Role | Any | Healer | DPS | DPS |
Objectives
- Arrive at the Claydot Cauldron: 0/1
- Clear the Claydot Cauldron: 0/1
- Arrive at the Clearnote Cauldron: 0/1
- Clear the Clearnote Cauldron: 0/1
- Arrive at the Kilnfire Cauldron: 0/1
- Defeat the mother porxie: 0/1
Enemies
- Exoray
- Relict Werewood
- Cave Mantis
- Cave Tarantula Hawk
- Spriggan Quarrier
- Spriggan Stonebearer
- Sonny of Ziggy
- Mud Bubble
- Cave Pugil
- Cave Gelatin
- Cave Opken
- Cave Hropken
- Icicle
- Unfinished Nixie
- Lava Phoebad
- Relict Flan
- Relict Licorice
- Pyroduct Eldthurs
- Relict Slime
- Relict Syrup
- Relict Bavarois
- Relict Marshmallow
- Relict Pudding
- Molten Phoebad
Bosses
 Mudman
The key mechanic of this fight is the balls of mud you need to aim into the corners of the room. Make sure that when you're tethered to a ball, line yourself up so that the ball shoots through you and into a hole in one of the corners of the room. Keep your eye out for little mud men inside the holes, if you see one, make sure you aim away from THAT hole, as it won't get rid of your ball and you'll continue to take damage from it.
Abilities
- Hard Rock - tankbuster, healers prepare and tanks pop some cooldowns.
- Petrified Peat - basic targeted AOE, split up and don't overlap hitboxes. This will leave mud balls on the battlefield (read Peat Pelt).
 Peat Pelt - tethers each player to one of the balls left on the field. Position yourself so the balls will shoot through you and into one of the holes (drains) on the edges of the battlefield.
- If you fail to lead a ball into a drain, then it will repeatedly roll into you, gaining size and dealing more damage with each roll.
- Later in the fight, this mechanic will repeat, but with mudmen blocking some of the drains. Avoid leading a ball into a mudman, as they will push the ball back with high damage that may one-shot you.
- Brittle Breccia - frontal 270-degree attack in 3 waves. Stand near an AoE, then step into it as it resolves to avoid the remaining AoEs.
- Stone Age is a room-wide AoE.
- Falling Rock - stack, make sure you group up to share the damage.
Nixie
The key mechanic of this fight is watching the sides of the room for the water pipes and standing where the water will not hit, as well as making sure you jump into one of the water sprouts that will shoot you up to the cloud where Nixie is singing during the "Singing in the Rain" phase. If you can do these two things, you'll be good as gold!
Abilities
- Smash-Crash - cleaving tankbuster that targets the tank with four tethers in a plus shape. The tethers cannot be intercepted, so everyone except the tank needs to stay away from the tethers.
- Shower Power - Nixie tethers to a wall, then makes 3 of the pipes on that wall glow. You need to stand in the lane that does not have a glowing pipe, to avoid the incoming water blast.
- Singing in the Rain - Nixie retreats to a cloud and summons some Unfinished Nixies that start casting. Water spouts will form around the room, which will knock players upward when touched. You need to stand on a water spout near the cloud to get knocked upward onto it, then defeat the Unfinished Nixies before they finish casting.
- After all the adds have been defeated, Nixie will cast
 Sea Shanty on the lower platform, killing anyone that is not standing on the cloud.
 - If the adds are not defeated in time, Sea Shanty will instead target the entire room including the cloud, wiping the party.
- Note that the NPCs in Duty Support will not use the water spouts - they will move up to the cloud only once the player has done so.
- After all the adds have been defeated, Nixie will cast
- Unnamed AOE Target is a basic targeted group AOE, and will overlap with previous mechanics. Just spread out to avoid excess damage.
- Unnamed Water Spouts will just form around the room (as they did during Singing in the Rain), and will overlap with previous mechanics. Avoid these as to not get stuck in place and get hit by other attacks.
 Porcine Porcelain: Mother Porxie
The key mechanics in the fight involve running against the wind immediately as you dodge incoming AOEs (otherwise you'll fall into a kill zone), and making sure when you see the room-wide "wind arrows" with a circle safe zone in the middle of the room, you're standing close to Mother Porxie, as she'll blow you back before denoting a room-wide AOE that does massive damage.
- Tender Loin - room-wide AOE spell that does moderate damage. Healers be ready to AOE heal after it's cast
- Huff and Puff - room-wide gust combined with a room-wide donut AOE. Stand close to Mother Porxie (not in the safe zone circle), as she'll blow you into the safe zone, before immediately denotating the room-wide AOE.
- Meat Mallet - proximity AoE, get to the opposite end of the arena to reduce damage and prepare for the next mechanic. This is immediately followed by Barbecue.
- Barbecue - The boss places a death zone in front of her, and starts pulling players towards her with wind, while various AoEs spawn. Keep running away from the boss while avoiding AoEs, as the wind will gradually increase in strength.
- You cannot use any actions during this attack (including
 Sprint), so continue holding away from the boss in order to not die!
 - Any players that end up in the death zone will be hit by To a Crisp, and instantly die.
- You cannot use any actions during this attack (including
- Hidden Huff and Puff - exactly like Huff and Puff, but the wind visual cue is not visible at ground level. Instead, a wind sprite will be summoned - when killed, it will explode and launch the party over the haze in the room, revealing Mother Porxie's position and the direction of the wind. Memorize this, and upon landing, position such that the wind will push you into the safe zone. Mother Porxie will reappear just a moment or so before the attack finally finishes charging.
- Open Flame - basic targeted AOE ability, don't overlap them to avoid excess damage
- Minced Meat - tankbuster single target spell, cooldowns and healing at the ready!
Loot
- See also: Heirloom Armor and Heirloom Accessories
 Mudman
Nixie
 Mother Porxie
 Mother Porxie Card (Drops at a fixed rate.)
| Name | Type | Item Level | Rarity | Quantity |
|---|---|---|---|---|
| Minion | N/A | Basic | 1 | |
| Orchestrion Roll | N/A | Basic | 1 | |
| Legs | 485 | Green | 1 | |
| Legs | 485 | Green | 1 | |
| Legs | 485 | Green | 1 | |
| Legs | 485 | Green | 1 | |
| Legs | 485 | Green | 1 | |
| Body | 485 | Green | 1 | |
| Body | 485 | Green | 1 | |
| Body | 485 | Green | 1 | |
| Body | 485 | Green | 1 | |
| Body | 485 | Green | 1 | |
| Legs | 485 | Green | 1 | |
| Legs | 485 | Green | 1 | |
| Body | 485 | Green | 1 | |
| Body | 485 | Green | 1 |
Treasure Coffers
 Treasure Coffer 1 (X: 12.4 Y: 10.6)
Treasure Coffer 2 (X: 10.5 Y: 10.2)
Treasure Coffer 3 (X: 11.8 Y: 13.4)
Treasure Coffer 4 (X: 11.7 Y: 11.1)
| Name | Type | Item Level | Rarity | Quantity |
|---|---|---|---|---|
| Earrings | 485 | Green | 1 | |
| Earrings | 485 | Green | 1 | |
| Earrings | 485 | Green | 1 | |
| Earrings | 485 | Green | 1 | |
| Earrings | 485 | Green | 1 | |
| Necklace | 485 | Green | 1 | |
| Necklace | 485 | Green | 1 | |
| Necklace | 485 | Green | 1 | |
| Necklace | 485 | Green | 1 | |
| Necklace | 485 | Green | 1 | |
| Materia | 420 | Basic | 1 | |
| Materia | 420 | Basic | 1 | |
| Materia | 420 | Basic | 1 | |
| Materia | 420 | Basic | 1 | |
| Materia | 420 | Basic | 1 | |
| Materia | 420 | Basic | 1 | |
| Materia | 420 | Basic | 1 |
Achievements
This duty is associated with the following achievements:
| Name | Points | Task | Reward | Patch |
|---|---|---|---|---|
| 10 | Discover every location within Matoya's Relict. | - | 5.45 |
Images
Gear Images
Dungeon Images


Other Images
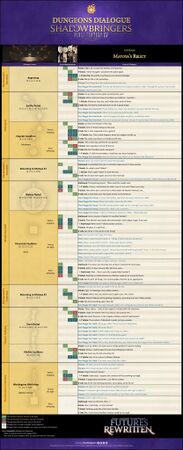
Dungeon Dialogue Infographic (credits: TrustInsighters)
