Difference between revisions of "The Forbidden Land, Eureka Pyros"
| (32 intermediate revisions by one other user not shown) | |||
| Line 5: | Line 5: | ||
| description = The expedition's quest to reach the headquarters of the Students of Baldesion at the center of the isle continues, and to that end they have relocated to a new base camp to utilize an ancient proto-aetheryte. Yet as they venture further north into a network of caves hidden within the massive mountains, frozen tundra gives way to smoldering lava: Pyros, a new region replete with new wonders and new threats... | | description = The expedition's quest to reach the headquarters of the Students of Baldesion at the center of the isle continues, and to that end they have relocated to a new base camp to utilize an ancient proto-aetheryte. Yet as they venture further north into a network of caves hidden within the massive mountains, frozen tundra gives way to smoldering lava: Pyros, a new region replete with new wonders and new threats... | ||
| image = Eureka Pyros banner.png | | image = Eureka Pyros banner.png | ||
| type = | | type = Field Operation | ||
| level = 70 | | level = 70 | ||
| level-sync = 70 | | level-sync = 70 | ||
| Line 53: | Line 53: | ||
| Northpoint | | Northpoint | ||
| | | | ||
: {{map icon|aetheryte}} Northpoint | : {{map icon|aetheryte-eureka}} Northpoint | ||
: {{map icon|landmark}} The Living Foundry | : {{map icon|landmark}} The Living Foundry | ||
|- | |- | ||
| Line 68: | Line 68: | ||
| Southwestern Ice Needles | | Southwestern Ice Needles | ||
| | | | ||
: {{map icon|aetheryte}} The Dragon Star Observatory | : {{map icon|aetheryte-eureka}} The Dragon Star Observatory | ||
: {{map icon|landmark}} The Dragon Star Observatory | : {{map icon|landmark}} The Dragon Star Observatory | ||
: {{map icon|landmark}} The Surgate Town House | : {{map icon|landmark}} The Surgate Town House | ||
| Line 74: | Line 74: | ||
| Bonfire | | Bonfire | ||
| | | | ||
: {{map icon|aetheryte}} The Firing Chamber | : {{map icon|aetheryte-eureka}} The Firing Chamber | ||
: {{map icon|landmark}} The Firing Chamber | : {{map icon|landmark}} The Firing Chamber | ||
|- | |- | ||
| West Flamerock | | West Flamerock | ||
| | | | ||
: {{map icon|aetheryte}} Carbonatite Quarry | : {{map icon|aetheryte-eureka}} Carbonatite Quarry | ||
: {{map icon|landmark}} Carbonatite Quarry | : {{map icon|landmark}} Carbonatite Quarry | ||
|- | |- | ||
| Line 85: | Line 85: | ||
| | | | ||
: {{map icon|landmark}} The Partisan's Proof | : {{map icon|landmark}} The Partisan's Proof | ||
: {{map icon|crystal-forge}} Mark II Crystal Forge | |||
: {{map icon|landmark}} The Ring of Fire | : {{map icon|landmark}} The Ring of Fire | ||
|} | |} | ||
| Line 94: | Line 95: | ||
==Quests== | ==Quests== | ||
Similar to the previous zones, Eureka Pyros contains a short storyline that must be completed to progress. These do not show up in the Journal, and | [[File:Pyros quest locations.png|thumb|right|400px|Quest objective and aetheryte locations]] | ||
Similar to the previous zones, Eureka Pyros contains a short storyline that must be completed to progress. These do not show up in the Journal, and some quest objectives will not be marked in the minimap. | |||
{| {{STDT|quest}} | {| {{STDT|quest}} | ||
! style="width:175px;"| Elemental Level | ! style="width:175px;"| Elemental Level | ||
! style="width: | ! style="width:400px;"| Solution | ||
! style="width:400px;"| Unlocks | |||
|- | |- | ||
| [[File:Otherquest.png|20px|link=]] 35<br>(On Entry) || Talk to [[Krile]]. Talk to her again in the Living Foundry to the north of the base. Return to the Northpoint base and talk to [[Gerolt (Eureka Pyros)|Gerolt]], then [[Drake (NPC)|Drake]]. Interact with the Logos Manipulator and select the {{item icon|Paralyze L}} logogram, then extract the mneme. Talk to Drake again, followed by Krile. Travel to the Northeastern Ice Needles (X:27.7, Y:27.1) and interact with the confluence. Afterwards, return and talk to Krile. | | [[File:Otherquest.png|20px|link=]] 35<br>(On Entry) || Talk to [[Krile]]. Talk to her again in the Living Foundry to the north of the base. Return to the Northpoint base and talk to [[Gerolt (Eureka Pyros)|Gerolt]], then [[Drake (NPC)|Drake]]. Interact with the Logos Manipulator and select the {{item icon|Paralyze L}} logogram, then extract the mneme. Talk to Drake again, followed by Krile. Travel to the Northeastern Ice Needles (X:27.7, Y:27.1) and interact with the confluence. Afterwards, return and talk to Krile. || [[Logos Actions]]<br>Elemental Weapon upgrades ([[Gerolt (Eureka Pyros)|Gerolt]]) | ||
|- | |- | ||
| [[File:Otherquest.png|20px|link=]] 38 || Talk to Krile. Travel to the Surgate Town House (X:18.6, Y:30.6) and interact with the | | [[File:Otherquest.png|20px|link=]] 38 || Talk to Krile. Travel to the Surgate Town House (X:18.6, Y:30.6) and interact with the Promising Scrap. Afterwards, return and talk to Drake, then Krile. Travel to the Firing Chamber (X:23.8, Y:17.0) and interact with the confluence. Finally, return again and talk to Krile. || Logos Manipulator upgrade, allowing two logos actions to be synthesized at once | ||
|- | |- | ||
| [[File:Otherquest.png|20px|link=]] 40 || Talk to Krile. Travel to West Flamerock (X:17.2, Y:11.6) and interact with the confluence. Afterwards, return and talk to Krile. | | [[File:Otherquest.png|20px|link=]] 40 || Talk to Krile. Travel to West Flamerock (X:17.2, Y:11.6) and interact with the confluence. Afterwards, return and talk to Krile. || | ||
|- | |- | ||
| [[File:Otherquest.png|20px|link=]] 45 || Talk to Krile. After the cutscenes, talk to | | [[File:Otherquest.png|20px|link=]] 45 || Talk to Krile. After the cutscenes, talk to her again in the Living Foundry. || | ||
|- | |- | ||
| [[File:Otherquest.png|20px|link=]] 50 || Talk to Krile. Travel to East Flamerock (X:34.0, Y:7.3) and interact with the confluence. Afterwards, return and talk to Krile. Finally, travel to the Cavern of the Second Cant (X:14.5, Y:37.6). | | [[File:Otherquest.png|20px|link=]] 50 || Talk to Krile. Travel to East Flamerock (X:34.0, Y:7.3) and interact with the confluence. Afterwards, return and talk to Krile. Finally, travel to the Cavern of the Second Cant (X:14.5, Y:37.6). || {{item icon|Making the Most of Pyros}}<br>{{questlink|feature|And We Shall Call It Hydatos}} > {{questlink|eureka|The Forbidden Land, Eureka Hydatos}} | ||
|} | |} | ||
==Shops & Services== | ==Shops & Services== | ||
{{merchant list|Eureka Pyros}} | {{merchant list|Eureka Pyros}} | ||
==[[Eureka | ==Enemies== | ||
{{ | In Pyros and the next zone, [[The Forbidden Land, Eureka Hydatos]], regular enemies receive a passive enhancement based on their element. These enhancements apply regardless of the elemental level difference between the player and enemy. | ||
*{{Eurekaelement icon|Wind}} '''Wind''': Higher evasion, causing your attacks to miss more often. Arguably the most annoying since it breaks combos. Can be countered with {{action icon|Feint L}}. | |||
*{{Eurekaelement icon|Fire}} '''Fire''': Higher damage. | |||
*{{Eurekaelement icon|Ice}} '''Ice''': Higher HP. | |||
*{{Eurekaelement icon|Lightning}} '''Lightning''': {{status effect|paralysis}} [[Paralysis]] immune. | |||
*{{Eurekaelement icon|Water}} '''Water''': {{status effect|stun}} [[Stun]] immune. | |||
*{{Eurekaelement icon|earth}} '''Earth''': {{status effect|heavy}} [[Heavy]] immune. | |||
FATE enemies may not necessarily have these enhancements. For example, the Karlabos of Pyros in {{questlink|eureka-nm|We're All Mad Here}} is vulnerable to Stun despite being water elemental. | |||
[[ | ==[[Eureka Pyros FATEs]]== | ||
[[File:Penthesilea promo.jpg|300px|right]] | |||
Similar to [[Eureka Pagos]], Pyros contains two elemental conflict (i.e., Happy Bunny) FATEs in addition to notorious monster (NM) battles. | |||
Among notorious monster battles, {{questlink|eureka-nm|Thirty Whacks}}, {{questlink|eureka-nm|Haunter of the Dark}}, and {{questlink|eureka-nm|Heavens' Warg}} are of particular interest, because they have a very low chance of dropping three items: {{item icon|Lamebrix's Dice}}, {{item icon|Ying-Yang's Tissue}}, and {{item icon|Skoll's Claw}}, respectively, that together can be exchanged at the [[Expedition Engineer]] to unlock a sixth magicite in the [[Magia Board]]. These items can be sold for a premium on the [[Market Board]]. Because of their high value, some players may not wait for others to arrive before pulling them once they spawn. To maximize's one's chances of earning rewards, be near the FATE spawn area a few minutes before its cooldown resets. {{questlink|eureka-nm|Heavens' Warg}} ([[Skoll]]) also has a weather requirement. It is recommended to use a [https://ffxiv-eureka.com/ tracker] if available for the instance. Some Eureka-oriented Discord servers have weather window notifications for {{questlink|eureka-nm|Heavens' Warg}} (the cooldown is instance-specific). | |||
The enemies required to spawn Skoll ([[Pyros Shuck]]) are a ways away from the actual FATE area. As a precaution in case the NM is early pulled before players who assisted with the prep arrive, some players will opt to prep the NM well in advance of the weather transitioning to [[Blizzards]]. | |||
{{Trim|{{:Eureka Pyros FATEs}}}} | |||
[[ | |||
{{ | |||
{{ | |||
==Happy Bunnies== | ==Happy Bunnies== | ||
| Line 205: | Line 157: | ||
*{{Item icon|Quicktongue Materia V}} | *{{Item icon|Quicktongue Materia V}} | ||
*{{Item icon|Battledance Materia V}} | *{{Item icon|Battledance Materia V}} | ||
| | | | ||
*{{Item icon|Conceptual Logogram}} | '''One of the following guaranteed:''' | ||
*{{Item icon|Fundamental Logogram}} | *{{Item icon|Conceptual Logogram}} (1-2) | ||
*{{Item icon|Fundamental Logogram}} (1-2) | |||
|- | |- | ||
| [[File:EurekaSilverBunnyChest.png|60px]] '''Silver''' | | [[File:EurekaSilverBunnyChest.png|60px]] '''Silver''' | ||
| {{gil|25000}} [[gil]] | | {{gil|25000}} [[gil]] | ||
| | | | ||
*{{Item icon|Savage Aim Materia VI}} | *{{Item icon|Savage Aim Materia VI}} | ||
*{{Item icon|Savage Might Materia VI}} | *{{Item icon|Savage Might Materia VI}} | ||
| Line 233: | Line 171: | ||
*{{Item icon|Quicktongue Materia VI}} | *{{Item icon|Quicktongue Materia VI}} | ||
*{{Item icon|Battledance Materia VI}} | *{{Item icon|Battledance Materia VI}} | ||
| | | | ||
*{{Item icon|Happy Bunny Card}} | *{{Item icon|Happy Bunny Card}} | ||
*{{Item icon|Modern Aesthetics - Form and Function}} | *{{Item icon|Modern Aesthetics - Form and Function}} | ||
*{{Item icon|Archaeodemon Horns}} | *{{Item icon|Archaeodemon Horns}} | ||
'''Guaranteed:''' | |||
*{{Item icon|Curative Logogram}} | *{{Item icon|Curative Logogram}} (1-5) | ||
|- | |- | ||
| [[File:EurekaGoldBunnyChest.png|60px]] '''Gold''' | | [[File:EurekaGoldBunnyChest.png|60px]] '''Gold''' | ||
| {{gil|100000}} [[gil]] | | {{gil|100000}} [[gil]] | ||
| | | | ||
*{{Item icon|Savage Aim Materia VI}} | *{{Item icon|Savage Aim Materia VI}} | ||
*{{Item icon|Savage Might Materia VI}} | *{{Item icon|Savage Might Materia VI}} | ||
| Line 257: | Line 187: | ||
*{{Item icon|Quicktongue Materia VI}} | *{{Item icon|Quicktongue Materia VI}} | ||
*{{Item icon|Battledance Materia VI}} | *{{Item icon|Battledance Materia VI}} | ||
| | | | ||
*{{Item icon|Modern Aesthetics - Form and Function}} | *{{Item icon|Modern Aesthetics - Form and Function}} | ||
*{{Item icon|Eldthurs Horn}} | *{{Item icon|Eldthurs Horn}} | ||
*{{Item icon|Offensive Logogram}} | '''One of the following guaranteed:''' | ||
*{{Item icon|Offensive Logogram}} (5-11) | |||
*{{Item icon|Protective Logogram}} | *{{Item icon|Protective Logogram}} (5-11) | ||
|} | |} | ||
== | ==Logos Actions== | ||
[[ | {{main|Logos Actions}} | ||
{{main|Logograms}} | |||
Logos actions are a new type of duty action available in Eureka Pyros, allowing players to dramatically increase their job's power or alter their playstyle. Logos actions are unlocked by collecting [[logograms]], appraising them from [[Drake (NPC)|Drake]] to obtain [[mneme]]s, and combining them at a Logos Manipulator. | |||
==Eurekan Weapons== | |||
{{see also|Eurekan Weapons|Eurekan Gear}} | |||
After fully augmenting a Eureka weapon in Pagos and proceeding to a certain point in the Pyros story, you will be able to augment your Eureka weapon further by speaking to [[Gerolt]] in Pyros (X:15.3 Y:23.5). | |||
Research into [[logos actions]] is required to augment Eureka weapons: 30 actions must be unlocked to finish weapon upgrades. | |||
===Pyros Weapons=== | |||
{{#lsth:Eurekan Weapons|Pyros Weapons}} | |||
==Elemental Armor== | |||
{{#section:Eurekan Armor|elemental-armor}} | |||
==Other Rewards== | |||
*{{Item reward||Pyros Lockbox}} | |||
*{{Item reward||Heat-warped Lockbox}} | |||
==Achievements== | ==Achievements== | ||
| Line 291: | Line 231: | ||
</gallery> | </gallery> | ||
{{Duties nav| | {{Duties nav|Field Operation}} | ||
[[Category:The Forbidden Land]] [[Category:Patch 4.4 Features]] | [[Category:The Forbidden Land, Eureka]] [[Category:Patch 4.4 Features]] | ||
Latest revision as of 01:24, 10 November 2024
- See also: The Forbidden Land, Eureka
The Forbidden Land, Eureka Pyros
- Level
- 70 (Sync: 70)
- Item Level
- 0 (Sync: 300)
- Elem. Level
- 35 (Sync: 50)
- Difficulty
- Normal
“The expedition's quest to reach the headquarters of the Students of Baldesion at the center of the isle continues, and to that end they have relocated to a new base camp to utilize an ancient proto-aetheryte. Yet as they venture further north into a network of caves hidden within the massive mountains, frozen tundra gives way to smoldering lava: Pyros, a new region replete with new wonders and new threats...
— In-game description
The Forbidden Land, Eureka Pyros is a level 70 field operation introduced in patch 4.45 with Stormblood.
It is the third of four areas in The Forbidden Land, Eureka, consisting of both a frozen region and a volcanic cavern. This zone, along with the Forbidden Land, Eureka Hydatos, allows players to use Logos Actions to significantly enhance their job's power or alter their playstyle.
Requirements
- Level Requirement: Disciple of War or Magic level 70
- Item Level Sync: 300
- Elemental Level Sync: 50
- Party Size: One to eight players
- While up to 144 players can simultaneously be in the instance, only party sizes of up to eight players are allowed. Players can freely join or leave parties inside the instance, but Party Finder is disabled.
- Role Restrictions: None
- Time Limit: 180 minutes
- The instance timer is specific to each player and commences upon entering the duty.
- Unrestricted Parties not allowed
- Limited Jobs not allowed
Unlock
Complete the quest And We Shall Call It Pyros
- Level: Disciple of War or Magic level 70
- Starting NPC: Rodney
- Starting NPC Location: Kugane (X:8.5 Y:14.2)
- Prerequisite: Players must first complete the story of The Forbidden Land, Eureka Pagos.
Locations
| Area | Points of Interest |
|---|---|
| Northpoint |
|
| Flurry | |
| The Cavern of the Second Cant | |
| Northeastern Ice Needles |
|
| Southwestern Ice Needles |
|
| Bonfire |
|
| West Flamerock |
|
| East Flamerock |
|
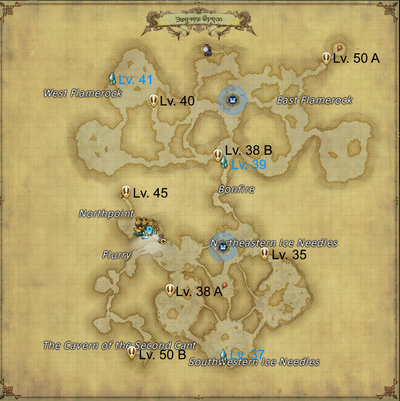
Players must attune to each aetheryte shard in order to travel to it, including the starting aetheryte in Northpoint.
- The south aetheryte (Dragon Star Observatory) is unlocked at elemental level 37.
- The middle aetheryte (Firing Chamber) is unlocked at elemental level 39.
- The northwest aetheryte (Carbonatite Quarry) is unlocked at elemental level 41.
Quests
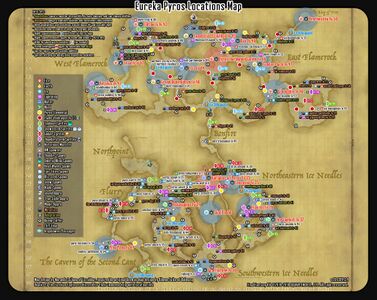
Similar to the previous zones, Eureka Pyros contains a short storyline that must be completed to progress. These do not show up in the Journal, and some quest objectives will not be marked in the minimap.
| Elemental Level | Solution | Unlocks |
|---|---|---|
(On Entry) |
Talk to Krile. Talk to her again in the Living Foundry to the north of the base. Return to the Northpoint base and talk to Gerolt, then Drake. Interact with the Logos Manipulator and select the Paralyze L logogram, then extract the mneme. Talk to Drake again, followed by Krile. Travel to the Northeastern Ice Needles (X:27.7, Y:27.1) and interact with the confluence. Afterwards, return and talk to Krile. | Logos Actions Elemental Weapon upgrades (Gerolt) |
| Talk to Krile. Travel to the Surgate Town House (X:18.6, Y:30.6) and interact with the Promising Scrap. Afterwards, return and talk to Drake, then Krile. Travel to the Firing Chamber (X:23.8, Y:17.0) and interact with the confluence. Finally, return again and talk to Krile. | Logos Manipulator upgrade, allowing two logos actions to be synthesized at once | |
| Talk to Krile. Travel to West Flamerock (X:17.2, Y:11.6) and interact with the confluence. Afterwards, return and talk to Krile. | ||
| Talk to Krile. After the cutscenes, talk to her again in the Living Foundry. | ||
| Talk to Krile. Travel to East Flamerock (X:34.0, Y:7.3) and interact with the confluence. Afterwards, return and talk to Krile. Finally, travel to the Cavern of the Second Cant (X:14.5, Y:37.6). | Making the Most of Pyros |
Shops & Services
| Merchant Name | Merchant Location |
|---|---|
| Expedition Artisan | (X:15.4, Y:23.9) |
| Expedition Birdwatcher | (X:17.6, Y:25.4) |
| Expedition Provisioner | (X:16.7, Y:23.8) |
| Gerolt | (X:15.3, Y:23.6) |
Enemies
In Pyros and the next zone, The Forbidden Land, Eureka Hydatos, regular enemies receive a passive enhancement based on their element. These enhancements apply regardless of the elemental level difference between the player and enemy.
 Wind: Higher evasion, causing your attacks to miss more often. Arguably the most annoying since it breaks combos. Can be countered with Feint L.
 Fire: Higher damage.
 Ice: Higher HP.
 Lightning:
  Paralysis immune.
 Water:
  Stun immune.
 Earth:
  Heavy immune.
FATE enemies may not necessarily have these enhancements. For example, the Karlabos of Pyros in ![]() We're All Mad Here is vulnerable to Stun despite being water elemental.
We're All Mad Here is vulnerable to Stun despite being water elemental.
Eureka Pyros FATEs
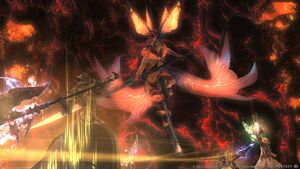
Similar to Eureka Pagos, Pyros contains two elemental conflict (i.e., Happy Bunny) FATEs in addition to notorious monster (NM) battles.
Among notorious monster battles, ![]() Thirty Whacks,
Thirty Whacks, ![]() Haunter of the Dark, and
Haunter of the Dark, and ![]() Heavens' Warg are of particular interest, because they have a very low chance of dropping three items: Lamebrix's Dice, Ying-Yang's Tissue, and Skoll's Claw, respectively, that together can be exchanged at the Expedition Engineer to unlock a sixth magicite in the Magia Board. These items can be sold for a premium on the Market Board. Because of their high value, some players may not wait for others to arrive before pulling them once they spawn. To maximize's one's chances of earning rewards, be near the FATE spawn area a few minutes before its cooldown resets.
Heavens' Warg are of particular interest, because they have a very low chance of dropping three items: Lamebrix's Dice, Ying-Yang's Tissue, and Skoll's Claw, respectively, that together can be exchanged at the Expedition Engineer to unlock a sixth magicite in the Magia Board. These items can be sold for a premium on the Market Board. Because of their high value, some players may not wait for others to arrive before pulling them once they spawn. To maximize's one's chances of earning rewards, be near the FATE spawn area a few minutes before its cooldown resets. ![]() Heavens' Warg (Skoll) also has a weather requirement. It is recommended to use a tracker if available for the instance. Some Eureka-oriented Discord servers have weather window notifications for
Heavens' Warg (Skoll) also has a weather requirement. It is recommended to use a tracker if available for the instance. Some Eureka-oriented Discord servers have weather window notifications for ![]() Heavens' Warg (the cooldown is instance-specific).
Heavens' Warg (the cooldown is instance-specific).
The enemies required to spawn Skoll (Pyros Shuck) are a ways away from the actual FATE area. As a precaution in case the NM is early pulled before players who assisted with the prep arrive, some players will opt to prep the NM well in advance of the weather transitioning to Blizzards.
Happy Bunnies
Pyros is also home to many a happy bunny. As a reward for saving them from imminent peril, happy bunnies will help you find hidden treasure on the island.
In Eureka Pyros, the southern FATE ![]() We're All Mad Here has treasure locations in the southern, lower-leveled region of the zone. The northern FATE
We're All Mad Here has treasure locations in the southern, lower-leveled region of the zone. The northern FATE ![]() Uncommon Nonsense has treasure locations in the northern, higher-leveled region of the zone. Most players will ignore the northern FATE due to the treasure locations being surrounded by high level enemies that will aggro to even elemental level capped players, making the treasure hunt a nuisance.
Uncommon Nonsense has treasure locations in the northern, higher-leveled region of the zone. Most players will ignore the northern FATE due to the treasure locations being surrounded by high level enemies that will aggro to even elemental level capped players, making the treasure hunt a nuisance.
| Treasure Coffer | Gil | Materia | Notable Drops |
|---|---|---|---|
|
One of the following guaranteed:
| |||
|
Guaranteed:
| |||
|
One of the following guaranteed:
|
Logos Actions
- Main article: Logos Actions
- Main article: Logograms
Logos actions are a new type of duty action available in Eureka Pyros, allowing players to dramatically increase their job's power or alter their playstyle. Logos actions are unlocked by collecting logograms, appraising them from Drake to obtain mnemes, and combining them at a Logos Manipulator.
Eurekan Weapons
- See also: Eurekan Weapons and Eurekan Gear
After fully augmenting a Eureka weapon in Pagos and proceeding to a certain point in the Pyros story, you will be able to augment your Eureka weapon further by speaking to Gerolt in Pyros (X:15.3 Y:23.5).
Research into logos actions is required to augment Eureka weapons: 30 actions must be unlocked to finish weapon upgrades.
Pyros Weapons
An upgrade to Elemental weapons. Weapons will have a white-blue flame particle effect.
| Item Quick Reference | Total for every weapon | ||||||
|---|---|---|---|---|---|---|---|
|
|
|
| Pyros Weapons (IL 385) | ||||||||||||||||||||||||||||||||
|---|---|---|---|---|---|---|---|---|---|---|---|---|---|---|---|---|---|---|---|---|---|---|---|---|---|---|---|---|---|---|---|---|
|
| Weapon Tier | IL | Items needed |
|---|---|---|
| Elemental +1 | 375 | |
| Elemental +2 | 380 | |
| Pyros | 385 |
How to acquire items to upgrade
- Pyros Crystal: These are acquired by killing Notorious Monsters in Eureka Pyros. The higher level the Notorious Monster, the more crystals it will drop.
- Penthesilea's Flame: 3 chunks will drop each time you complete the FATE
 Lost Epic with gold medal credit in Eureka Pyros, which requires you to kill the notorious monster Penthesilea. Penthesilea's Flames can also be purchased from the Expedition Birdwatcher for 50 Pyros Crystals each.
Elemental Armor
Can be bought from Expedition Artisan in The Forbidden Land, Eureka Pyros, each piece for 40 Pyros Crystals. Players must have at least 50 Logos Actions unlocked, and must have acquired at least one Elemental Weapon, to be able to purchase these items.
| Item Quick Reference | ||
|---|---|---|
|
|
| Elemental Armor (IL 380) |
|---|
Other Rewards
Achievements
This duty is associated with the following achievements:
| Name | Points | Task | Reward | Patch |
|---|---|---|---|---|
| Mapping the Realm: Eureka Pyros | 10 | Discover every location within the Forbidden Land, Eureka Pyros. | - | 4.45 |
| Making the Most of Pyros | 10 | Complete all the scenario quests within the Forbidden Land, Eureka Pyros. | - | 4.45 |


