Difference between revisions of "Command Missions"
(correction: killing the previously-engaged target will not lift disengage. Also adding speed-kill note on all-seeing eye) |
(achievements) |
||
| (5 intermediate revisions by the same user not shown) | |||
| Line 155: | Line 155: | ||
;General mechanics | ;General mechanics | ||
Unit members have much-higher defenses than players, and are unaffected by several fight mechanics, such as [[The Aurum Vale]]'s [[File:Burrs.png|link=]] Burrs debuff. | Unit members have much-higher defenses than players, and are unaffected by several fight mechanics, such as [[The Aurum Vale]]'s [[File:Burrs.png|link=]] Burrs debuff. | ||
* Unit members do not attempt to resolve fight mechanics, so it is fully on the player to do so when necessary. In some cases, this may require telling the squadron to disengage | * Unit members do not attempt to resolve fight mechanics, so it is fully on the player to do so when necessary. In some cases, this may require telling the squadron to disengage. | ||
Unit members use some old job actions that are no longer available to players - for example, {{GLA}} [[Gladiator]]s use {{action icon|Flash}}; {{ACN}} [[Arcanist]]s use {{action icon|Bane}} and {{action icon|Shadow Flare}}. | Unit members use some old job actions that are no longer available to players - for example, {{GLA}} [[Gladiator]]s use {{action icon|Flash}}; {{ACN}} [[Arcanist]]s use {{action icon|Bane}} and {{action icon|Shadow Flare}}. | ||
| Line 168: | Line 168: | ||
;Recommended classes | ;Recommended classes | ||
{{ACN}} [[Arcanist]]s are very effective unit members, as they frequently use AoEs to defeat enemies quickly. They also apply {{status effect|slow}} [[Slow]] (via {{action icon|Shadow Flare}}) and occasionally heal with {{action icon|Physick}}, making the healer's job easier. | {{ACN}} [[Arcanist]]s are very effective unit members, as they frequently use AoEs to defeat enemies quickly. They also apply {{status effect|slow}} [[Slow]] (via {{action icon|Shadow Flare}}) and occasionally heal with {{action icon|Physick}}, making the healer's job easier. | ||
* When | * When {{action icon|Shadow Flare}} is used, it leaves a purple zone on the ground that deals damage-over-time and applies {{status effect|slow}} [[Slow]] to enemies inside it. Try to lure enemies into this zone whenever possible. | ||
{{ARC}} [[Archer]]s are also good at spamming AoEs with {{action icon|Quick Nock}}. | {{ARC}} [[Archer]]s are also good at spamming AoEs with {{action icon|Quick Nock}}. | ||
| Line 185: | Line 185: | ||
Example cases to use Disengage: | Example cases to use Disengage: | ||
* [[Halatali]]: | * [[Halatali]]: | ||
** Tangata (last boss): Disengage when it summons a pool of fire and becomes invulnerable. Target the fire wisps and use Engage to fight them, as defeating them is required to remove the invulnerability. | |||
** Tangata (last boss): Disengage when it summons a pool of fire and becomes invulnerable. Target the | |||
* [[The Thousand Maws of Toto-Rak]]: | * [[The Thousand Maws of Toto-Rak]]: | ||
** Graffias (last boss): Disengage when it summons a green pool of poison. Wait somewhere outside of the pool to lure the boss out of it, then Re-engage once it's safe. | ** Graffias (last boss): Disengage when it summons a green pool of poison. Wait somewhere outside of the pool to lure the boss out of it, then Re-engage once it's safe. | ||
* [[Dzemael Darkhold]]: | * [[Dzemael Darkhold]]: | ||
** All-seeing Eye (first boss): After getting aggro, disengage and wait in the crystal's light for the boss to approach. Once it's in the light and its invulnerability is gone, re-engage. When the crystal is about to wear off, disengage, go into a new crystal's light, and repeat the process. If the Offensive tactic is leveled up enough, it's also possible to kill the boss before the first crystal wears off. | ** All-seeing Eye (first boss): After getting aggro, disengage and wait in the crystal's light for the boss to approach. Once it's in the light and its invulnerability is gone, re-engage. When the crystal is about to wear off, disengage, go into a new crystal's light, and repeat the process. If the Offensive tactic is leveled up enough, it's also possible to kill the boss before the first crystal wears off. | ||
| Line 201: | Line 198: | ||
;Reviving | ;Reviving | ||
If your healer is incapacitated | Healers will only attempt to revive unit members when out of combat. | ||
If your healer is incapacitated, consumable items such as {{item icon|Phoenix Down}} and {{item icon|High-grade Company-issue Tonic}} can be used to revive them. If you have no means to revive unit members, any which are incapacitated will remain so until the player is incapacitated, at which time the full party will be returned to the start of the dungeon. | |||
Reviving a unit member (regardless of method) will not incur the [[File:Transcendent icon1.png]] Transcendent buff, nor the {{status effect|weakness}} [[Weakness]] or {{status effect|brink of death}} [[Brink of Death]] debuffs. | Reviving a unit member (regardless of method) will not incur the [[File:Transcendent icon1.png]] Transcendent buff, nor the {{status effect|weakness}} [[Weakness]] or {{status effect|brink of death}} [[Brink of Death]] debuffs. | ||
| Line 208: | Line 207: | ||
{{action icon|Ungarmax}} is significantly stronger than the player's own [[limit break]], and it only uses 1 bar instead of all bars. Try to use it at the start of a boss fight, to make the most of the 15-second {{buff|damage up}} '''[[Damage Up]]''' buff. | {{action icon|Ungarmax}} is significantly stronger than the player's own [[limit break]], and it only uses 1 bar instead of all bars. Try to use it at the start of a boss fight, to make the most of the 15-second {{buff|damage up}} '''[[Damage Up]]''' buff. | ||
* If you have any damage-over-time effects, try to apply them after this buff activates, to snapshot the buffed state. | * If you have any damage-over-time effects, try to apply them after this buff activates, to snapshot the buffed state. | ||
* For bosses that become invulnerable at certain points in the fight, it may be better to use the limit break immediately after they lose the invulnerability. This decreases the chance that they will go invulnerable again while the damage up buff is still active | |||
;Managing loot | ;Managing loot | ||
When doing a Command Mission, all loot from chests will go straight to you instead of using the loot rolling system. This can quickly give you a lot of loot, probably more than you will actually use. | When doing a Command Mission, all loot from chests will go straight to you instead of using the loot rolling system. This can quickly give you a lot of loot, probably more than you will actually use. | ||
* To prevent unwanted loot from mixing with your regularly-used gear, it may help to set items to go directly to your inventory instead of your armoury chest. To do this, go to System -> Character Configuration -> Item Settings -> uncheck the box next to "store all newly obtained items in the armoury chest". This will cause items to be sent to the first open inventory slot. | |||
* Optionally, check the box next to "store all newly obtained items in the last open inventory slot" to have items go to the last slot instead. | |||
Some suggestions on what to do with unwanted gear: | Some suggestions on what to do with unwanted gear: | ||
| Line 220: | Line 222: | ||
* If you're using the desynthesis option, note that you can desynth while you're still in the dungeon, therefore desynthing between chests can help keep your inventory clear for more dupes. | * If you're using the desynthesis option, note that you can desynth while you're still in the dungeon, therefore desynthing between chests can help keep your inventory clear for more dupes. | ||
* If you want to keep some gear for alt jobs, but still want the benefits of having dupes to desynth/turn in, then put the gear you want to keep in a separate inventory (Chocobo Saddlebags are easiest), so it won't block you from receiving dupes. | * If you want to keep some gear for alt jobs, but still want the benefits of having dupes to desynth/turn in, then put the gear you want to keep in a separate inventory (Chocobo Saddlebags are easiest), so it won't block you from receiving dupes. | ||
* [[Dzemael Darkhold]] is the single exception to this, as its gear drops are not tagged as unique. | * [[Dzemael Darkhold]] is the single exception to this, as most of its gear drops (except the {{item icon|Pince-nez}}) are not tagged as unique. | ||
* For weapon + shield bundles, the unique check applies separately for the bundle and its contents. This means you can open a bundle, keep the contents in your inventory, and then receive another of the same bundle. | * For weapon + shield bundles, the unique check applies separately for the bundle and its contents. This means you can open a bundle, keep the contents in your inventory, and then receive another of the same bundle. | ||
| Line 236: | Line 238: | ||
* Chemistry-based rewards (reduced quantity) | * Chemistry-based rewards (reduced quantity) | ||
* Chance to learn a new Battle Tactic, increase an existing Tactic's mastery or gain a new chemistry preference (not guaranteed) | * Chance to learn a new Battle Tactic, increase an existing Tactic's mastery or gain a new chemistry preference (not guaranteed) | ||
==Achievements== | |||
{{main|Grand Company Achievements}} | |||
{| {{STDT| mech1 sortable align-left}} | |||
{{achievement table header}} | |||
{{achievement table row|Dear Leader I}} | |||
{{achievement table row|Dear Leader II}} | |||
{{achievement table row|Dear Leader III}} | |||
|} | |||
==Images== | ==Images== | ||
Latest revision as of 08:29, 3 December 2024
“Put your squadron's training to the test with command missions─four-man unit operations that will take you on forays into perilous dungeons. With an increased level cap and the option to glamour your squadron's equipment, now is your chance to impress the higher-ups and make a name for yourself in your Grand Company.
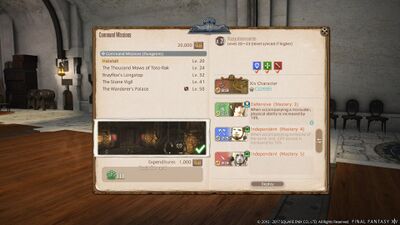
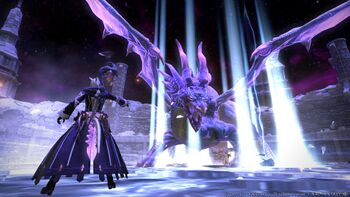
Command Missions is a feature of Adventurer Squadrons released in patch 4.1 of Stormblood. It allows the player to enter an dungeon with 3 unit members. While unit members have their own free will, responding as the situation demands, they can be given orders to guide their actions.
Requirements
- Squadron Rank 2 or above
- Listen to the squadron sergeant's explanation about new missions
Eligible Dungeons
| Dungeon | Level | iLvl | Expenditures | Squadron EXP |
|---|---|---|---|---|
| Halatali | 20 | |||
| The Thousand Maws of Toto-Rak | 24 | |||
| Brayflox's Longstop | 32 | |||
| The Stone Vigil | 41 | |||
| Dzemael Darkhold | 44 | |||
| The Aurum Vale | 47 | |||
| The Wanderer's Palace | 50 | 110 | ||
| Pharos Sirius | 50 | 110 | ||
| Copperbell Mines (Hard) | 50 | 110 | ||
| Brayflox's Longstop (Hard) | 50 | 110 | ||
| The Wanderer's Palace (Hard) | 50 | |||
| Sohm Al | 53 | |||
| The Vault | 57 | |||
| The Fractal Continuum | 60 | 210 | ||
| Pharos Sirius (Hard) | 60 | 240 |
- Players must have unlocked these dungeons prior to deploying command missions.
- Party composition is restricted to 1
 Healer, 1
  Tank, and 2
  DPS.
DPS. - Limited Jobs (such as
 Blue Mage) are not allowed in command missions.
Forming a Party
To start a command mission, a party of one tank, one healer, and two DPS is required. This includes the player's role.
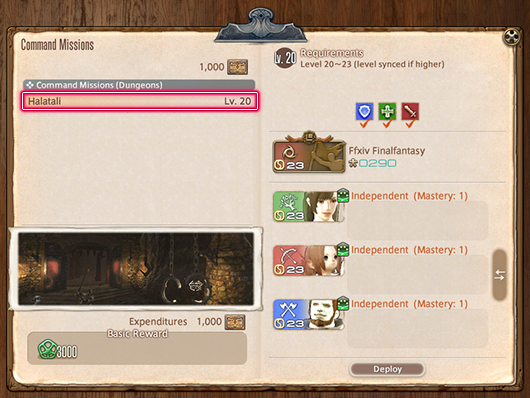
1. Select "Command missions" after speaking with the squadron sergeant.
2. Select a command mission from the list.
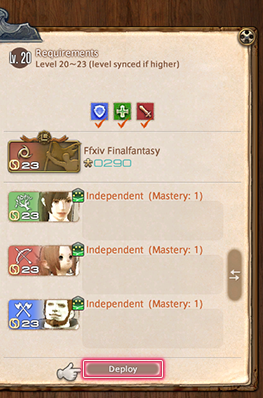
3. Choose the unit members you wish to take, and select "Deploy."
4. You will now enter the command mission with the selected unit members.
Giving Orders
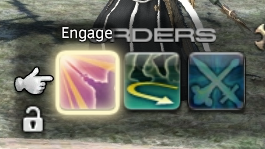
The Orders hotbar will appear upon entering a command mission, and includes the various Order actions.
The available Orders are as follows:
Engage - Tells your unit to attack the targeted enemy.
- Specifically, the tank will pull the enemy with a ranged attack if it has not already been aggro'd.
- If you are the tank, then a unit member with a ranged attack will pull the enemy.
Disengage - Disengage tells your unit to break off combat and regroup near you. While Disengage is in effect, it will be replaced with the order Re-engage. The Disengage status can be lifted by issuing either the Engage or Re-engage order.
- While Disengaged, unit members will not attempt combat at all (including healing) until the status is lifted.
- Attacking an enemy yourself will not lift the Disengage status.
- Killing the previously-engaged enemy also will not lift the Disengage status.
Re-engage - Lifts the Disengage status.
- Unit members will resume attacking the enemy they previously Engaged with, not the enemy you are currently targeting.
Execute Limit Break - Causes all unit members to perform the Ungarmax limit break when the casting time has ended. This costs one level of the limit gauge, and does not consume partial bars.
- Ungarmax deals single-target damage and grants
 Damage Up to the entire party for 15 seconds.
Orders can be set to your other hotbars by selecting them from the Orders interface found within Actions & Traits. There is also an action for toggling the Orders hotbar, which can be set to hotbars.
Battle Tactics
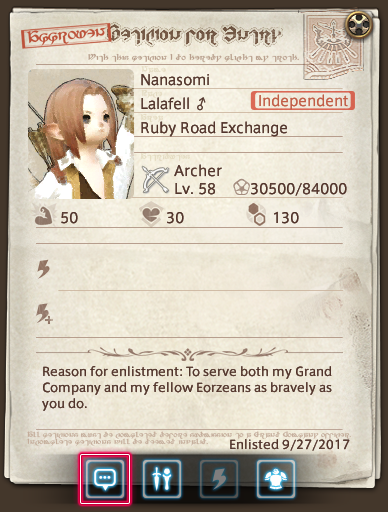
Battle Tactics govern unit members' behavior during a command mission. New battle tactics may be acquired by completing command missions. One battle tactic can be assigned to each unit member.
Speak with a unit member and select Display Orders from the enlistment papers.
Selecting Display Orders opens the Specify Battle Tactics
- Initially, only the Independent battle tactic is available.
When a command mission is completed, each unit member has a chance to either learn a new tactic, or raise the level of 1 already-learned tactic at random.
Tactics will adjust the unit member's performance as follows:
| Tactic | Level | HP | Damage Dealt | Damage Received |
|---|---|---|---|---|
| Independent | 1 | +4% | +4% | -4% |
| 2 | +8% | +8% | -8% | |
| 3 | +12% | +12% | -12% | |
| 4 | +16% | +16% | -16% | |
| 5 | +20% | +20% | -20% | |
| Offensive | 1 | - | +12% | - |
| 2 | - | +24% | - | |
| 3 | - | +36% | - | |
| 4 | - | +48% | - | |
| 5 | - | +60% | - | |
| Defensive | 1 | +6% | - | -6% |
| 2 | +12% | - | -12% | |
| 3 | +18% | - | -18% | |
| 4 | +24% | - | -24% | |
| 5 | +30% | - | -30% | |
| Balanced | 1 | +6% | +6% | - |
| 2 | +12% | +12% | - | |
| 3 | +18% | +18% | - | |
| 4 | +24% | +24% | - | |
| 5 | +30% | +30% | - |
Tips and Tricks
- General mechanics
Unit members have much-higher defenses than players, and are unaffected by several fight mechanics, such as The Aurum Vale's ![]() Burrs debuff.
Burrs debuff.
- Unit members do not attempt to resolve fight mechanics, so it is fully on the player to do so when necessary. In some cases, this may require telling the squadron to disengage.
Unit members use some old job actions that are no longer available to players - for example, ![]() Gladiators use Flash;
Gladiators use Flash; ![]() Arcanists use Bane and Shadow Flare.
Arcanists use Bane and Shadow Flare.
- Their skill sets are mostly frozen in time at around patch 4.0 (Stormblood), but they also receive updates on skills that still exist now. For example: tank stances such as Defiance formerly required upgrading to a job (Warrior in this case), but have since been changed so they're accessible by the base class (Marauder in this case) - therefore, unit member tanks can use the tank stances.
- Quick reminder: unit members can only have Classes, not Jobs, so they cannot access actions that are only available to Jobs. For example: this means that
 Lancers do not have access to any AoE skill, as Doom Spike requires being a
  Dragoon.
Additionally, level sync does not restrict a unit member's available skills - they have access to all of them, regardless of synced level. For example: Arcanists can use Shadow Flare (level 50 skill) even when they are level synced below 50. Ditto for Conjurers using Medica II (level 50 skill).
- Tactics
Tactics-wise, it is generally best to set the Offensive tactic on all unit members (including tanks and healers), as they are already very bulky. The higher damage can allow for faster dungeon clears, and the Offensive tactic also increases the amount of healing the healer does.
- Recommended classes
![]() Arcanists are very effective unit members, as they frequently use AoEs to defeat enemies quickly. They also apply
Arcanists are very effective unit members, as they frequently use AoEs to defeat enemies quickly. They also apply ![]() Slow (via Shadow Flare) and occasionally heal with Physick, making the healer's job easier.
Slow (via Shadow Flare) and occasionally heal with Physick, making the healer's job easier.
- When Shadow Flare is used, it leaves a purple zone on the ground that deals damage-over-time and applies
 Slow to enemies inside it. Try to lure enemies into this zone whenever possible.
![]() Archers are also good at spamming AoEs with Quick Nock.
Archers are also good at spamming AoEs with Quick Nock.
The other DPS classes generally don't use AoEs very often, but they do high damage against single targets like bosses.
- Since most of a dungeon involves fighting packs of enemies, it's usually better to just prioritize the AoE spammers (Arcanist and Archer) instead.
- Engaging battle
When pulling packs of enemies, using the Engage action will tell the tank to pull them. However, the tank tends to tunnel vision on that single target, and will not attempt to grab enemies that they lose enmity on. It's much more effective to pull packs yourself with an AoE, so the enemies crowd around you, then run into the tank so they can take the whole pack's enmity at once.
- Disengaging from battle
If you use the Disengage option, then unit members will completely stop attacking until told to Re-engage the same target, or Engage a new target. They will also start following you closely.
- Unit members will usually not retreat from a boss, even if the boss places a damage-over-time puddle on the ground, becomes invulnerable, or leaves the battlefield (unit members will stay in place, as if the boss never left). Disengage will force them to retreat, which is helpful for certain fights.
- Be careful: if you Disengage and then attack something without using Engage/Re-engage, then your unit members will not help you fight it, and the healer will not heal you. They will only resume combat once they are told to Engage/Re-engage.
Example cases to use Disengage:
- Halatali:
- Tangata (last boss): Disengage when it summons a pool of fire and becomes invulnerable. Target the fire wisps and use Engage to fight them, as defeating them is required to remove the invulnerability.
- The Thousand Maws of Toto-Rak:
- Graffias (last boss): Disengage when it summons a green pool of poison. Wait somewhere outside of the pool to lure the boss out of it, then Re-engage once it's safe.
- Dzemael Darkhold:
- All-seeing Eye (first boss): After getting aggro, disengage and wait in the crystal's light for the boss to approach. Once it's in the light and its invulnerability is gone, re-engage. When the crystal is about to wear off, disengage, go into a new crystal's light, and repeat the process. If the Offensive tactic is leveled up enough, it's also possible to kill the boss before the first crystal wears off.
- Batraal (last boss): When a corrupted crystal spawns, engage the crystal immediately. This isn't so much a "disengage this" as an "engage something else", but is still worth noting.
- Healer behavior
The healer can occasionally react too slowly to the party taking damage. There are some measures to help them out:
- Bring an
 Arcanist and bait enemies into Shadow Flare, as mentioned above.
 - Try to limit tank pulls to single or double packs. Avoid full wall-to-wall pulls.
- Reviving
Healers will only attempt to revive unit members when out of combat.
If your healer is incapacitated, consumable items such as Phoenix Down and High-grade Company-issue Tonic can be used to revive them. If you have no means to revive unit members, any which are incapacitated will remain so until the player is incapacitated, at which time the full party will be returned to the start of the dungeon.
Reviving a unit member (regardless of method) will not incur the ![]() Transcendent buff, nor the
Transcendent buff, nor the ![]() Weakness or
Weakness or ![]() Brink of Death debuffs.
Brink of Death debuffs.
- Using Limit Break
Ungarmax is significantly stronger than the player's own limit break, and it only uses 1 bar instead of all bars. Try to use it at the start of a boss fight, to make the most of the 15-second ![]() Damage Up buff.
Damage Up buff.
- If you have any damage-over-time effects, try to apply them after this buff activates, to snapshot the buffed state.
- For bosses that become invulnerable at certain points in the fight, it may be better to use the limit break immediately after they lose the invulnerability. This decreases the chance that they will go invulnerable again while the damage up buff is still active
- Managing loot
When doing a Command Mission, all loot from chests will go straight to you instead of using the loot rolling system. This can quickly give you a lot of loot, probably more than you will actually use.
- To prevent unwanted loot from mixing with your regularly-used gear, it may help to set items to go directly to your inventory instead of your armoury chest. To do this, go to System -> Character Configuration -> Item Settings -> uncheck the box next to "store all newly obtained items in the armoury chest". This will cause items to be sent to the first open inventory slot.
- Optionally, check the box next to "store all newly obtained items in the last open inventory slot" to have items go to the last slot instead.
Some suggestions on what to do with unwanted gear:
- Desynthesis it for desynthesis exp. However, note that you will stop gaining desynth exp once your desynth level is 50 above the gear's item level. The items you get can be used for crafting, or sold on the market board for a little
 Gil.
Gil. - Turn it in to your Grand Company for
 Company seals, using the Expert Delivery option. This can even get you a net profit of seals, compared to the cost of doing the mission.
Something to note: most dungeon gear will have the "unique" tag, meaning you can only have 1 copy of that gear piece per inventory - that is, 1 in your normal inventory + armory chest (these are shared), 1 in your Chocobo Saddlebag, and 1 in each Retainer's inventory. Dungeon loot will not account for which gear you already have - it can and will attempt to give you duplicates at random. When this happens, the duplicate is simply lost.
- Therefore, it's best to deal with all your loot in-between dungeon runs, to reduce the chance of missing out on anything in your next run.
- If you're using the desynthesis option, note that you can desynth while you're still in the dungeon, therefore desynthing between chests can help keep your inventory clear for more dupes.
- If you want to keep some gear for alt jobs, but still want the benefits of having dupes to desynth/turn in, then put the gear you want to keep in a separate inventory (Chocobo Saddlebags are easiest), so it won't block you from receiving dupes.
- Dzemael Darkhold is the single exception to this, as most of its gear drops (except the Pince-nez) are not tagged as unique.
- For weapon + shield bundles, the unique check applies separately for the bundle and its contents. This means you can open a bundle, keep the contents in your inventory, and then receive another of the same bundle.
Rewards
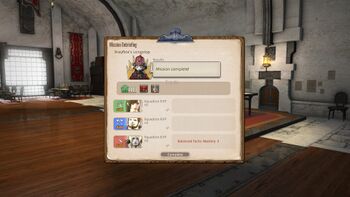
Completing Command Missions rewards all standard dungeon loot and ![]() character XP, plus
character XP, plus ![]() Squadron XP for all squadmates, and potential for additional loot such as High-grade Company-issue Tonic and Grand Company Aetheryte Tickets. Chemistry bonuses that grant additional rewards such as MGP and materia can also trigger, albeit yielding less than squadron missions. Each squadron member may also but is not guaranteed to either learn a new Battle Tactic, increase an existing Tactic's mastery, or gain a new chemistry preference.
Squadron XP for all squadmates, and potential for additional loot such as High-grade Company-issue Tonic and Grand Company Aetheryte Tickets. Chemistry bonuses that grant additional rewards such as MGP and materia can also trigger, albeit yielding less than squadron missions. Each squadron member may also but is not guaranteed to either learn a new Battle Tactic, increase an existing Tactic's mastery, or gain a new chemistry preference.
In summary;
- Standard dungeon loot from all chests (weapons, armor, accessories, etc.)
 Boss EXP for Player's current class/job (includes Armory & Rested bonuses)
 Squadron XP for all AI-controlled squadron members
- Additional special items ( Company-issue Tonics, Grand Company Aetheryte Tickets, etc.)
- Chemistry-based rewards (reduced quantity)
- Chance to learn a new Battle Tactic, increase an existing Tactic's mastery or gain a new chemistry preference (not guaranteed)
Achievements
- Main article: Grand Company Achievements
| Name | Points | Task | Reward | Patch |
|---|---|---|---|---|
| Dear Leader I | 5 | Lead your squadron on 10 successful command missions. | - | 4.1 |
| Dear Leader II | 5 | Lead your squadron on 30 successful command missions. | - | 4.1 |
| Dear Leader III | 10 | Lead your squadron on 100 successful command missions. | - | 4.1 |
