Difference between revisions of "The Minstrel's Ballad: Shinryu's Domain"
Noahop5000 (talk | contribs) |
|||
| Line 1: | Line 1: | ||
{{EX notice}} | |||
{{otheruses|the level 70 challenge-mode [[trial]]|the story-mode [[Main Scenario]] [[trial]]|The Royal Menagerie}} | {{otheruses|the level 70 challenge-mode [[trial]]|the story-mode [[Main Scenario]] [[trial]]|The Royal Menagerie}} | ||
{{Duty infobox | {{Duty infobox | ||
Revision as of 00:48, 29 July 2023
 This article is about the level 70 challenge-mode trial. For the story-mode Main Scenario trial, see The Royal Menagerie.
The Minstrel's Ballad: Shinryu's Domain
- Level
- 70 (Sync: 70)
- Item Level
- 320
- Difficulty
- Extreme
- Party size
- Full Party
8 man • 2 2
2  4
4 
- Unsyncing
- Allowed
- Time limit
- 60 minutes
- Duty Finder
- High-end Trials (Stormblood)
- Roulette
- Mentor
- Tomestones
 20
20 - Req. quest
 Songs in the Key of Kugane
- Location
- Transparency
- Region
- Gyr Abania
- Stone, Sky, Sea
- Available
- Patch
- 4.1
 The Echo
- On wipe: +5% (max +25%)
“A god born of sorrow and despair. A man who lives only for death. As one they fought the Warrior of Light, and as one they fell. No words could do this titanic encounter justice... unless they come from the wandering minstrel, to whom no event is beyond improvement. As his nimble fingers pluck out the chords, his rich voice carries you to a place above the world, one that is at once familiar and foreign: Shinryu's domain.
— In-game description
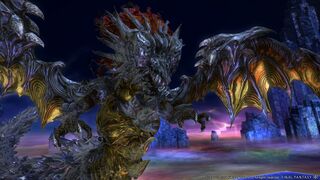
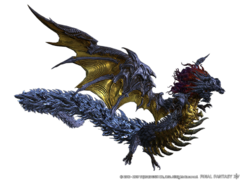
The Minstrel's Ballad: Shinryu's Domain is a level 70 trial introduced in patch 4.1 with Stormblood.
Strategy
 Primal: Shinryu
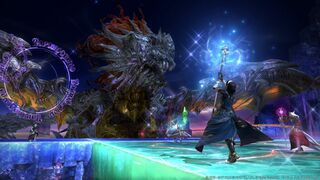
Much like normal mode, your battle against Shinryu will involve the presence of a Corrupted Aether Gauge. Once the gauge reaches 100, Shinryu will execute a special attack. In addition, players must also contend with The Worm's Heart - an attackable piece of Shinryu that will regenerate over the course of the battle. If the Corrupted Aether Gauge reaches maximum while The Worm's Heart is active, participants will suffer an unavoidable raid-wipe. However, whenever the heart is destroyed, Shinryu will suffer major damage. Inbetween each ultimate, Shinryu will use its left and right-wing to bombard the raid with further mechanics.
Unlike normal mode, your battle against Shinryu will immediately begin on the chequered platform seen in Phase 2 of Normal mode. Furthermore, the middle tile can now be destroyed, and should that happen, the raid will suffer an unavoidable wipe. All tiles (including the central tile) can only withstand two direct attacks from Shinryu before breaking, so watch out!
Lastly, both the main enmity target and the off-tank will suffer continuous auto-attacks from Shinryu, keeping Healers on their toes throughout the battle.
Phase 1
With the above notes in mind, participants should begin the battle by immediately destroying The Worm's Heart as soon as possible.
- Earthen Fury (Ultimate) is scripted to be the first ultimate attack once the Corrupted Aether Gauge is full, resulting in unavoidable damage to the entire raid and outright destroying the eastern and western tiles, as well as dealing one hit to various other platforms (leaving noticeable cracks).
- Burning Chains will tether individual players to another in their respective roles; such as the two tanks, the two healers, and damage-dealers to a fellow damage-dealer. These chains can be broken by stretching them (i.e, tethered players running in opposite directions). If they are not broken in time, tethered players will be afflicted with Fire Damage and Supperation debuffs.
- Tidal Wave (Ultimate), another ultimate attack that requires 100 Corrupted Aether, will create a whirlpool at either the west, east or southern side of the platform that will eventually inflict a major knockback along with moderate raid damage. Participants must stand close to the whirlpool in order to avoid being punted off the platform, though they must also be mindful of overlapping mechanics and missing platform tiles when doing so.
- Water Puddles will form at various locations whenever Shinryu executes a water or ice based ultimate (such as above-mentioned Tidal Wave). By standing in a puddle, players will gain a major Fire Resistance buff but also a massive Lightning Vulnerability debuff. These must be used (or avoided) when dealing with certain fire or lighting based mechanics later on. Bear in mind that these puddles will be destroyed via Fire or Lightning mechanics.
- Summon Icicle, a special attack by Shinryu's Left Wing, will summon 3 icicles at the edge of the platform (opposite Shinryu's current location) which will eventually dash across the entire platform in a straight line, inflicting damage, knockback and debuffs to anyone caught in their path. To avoid, players must position themselves out of harm's way.
- Tail Slam will mark a random healer with a noticeable green icon resembling Shinryu's tail. After a brief delay, Shinryu will slam down its tail (from the side of the platform closest to the marked player) and deal damage to two tiles, as well as anyone caught in its path. If the tail-marker is dropped in a way where it will collide with at least one undamaged tile, the tail will remain attackable for a brief period, giving the raid an opportunity to destroy it for major damage to Shinryu. If, however, the tail-marker is dropped on two damaged tiles, both tiles will immediately be destroyed with no opportunity to attack the tail, which also leaves the group with less room to deal with future mechanics.
- Shortly after the first Tail Slam has finished, one of two abilities cast by Shinryu's Right Wing will land. This can either be Levinbolt - a lightning spell that will blast each player with AoE lightning (amplified on anyone standing within a water puddle) - or Hypernova - a concentrated blast of fire damage that requires players to stack within a water puddle and share the damage. Bear in mind that Levinbolt is indicated by a purple-coloured icon, whereas Hypernova is indicated by a flaming orange icon.
- The Worm's Heart will regenerate, placing the raid under a DPS check where they must once again destroy the heart before the Corrupted Aether Gauge reaches full.
- Ice Storm, an unavoidable raid-wide damage ability from Shinryu's Left Wing, will follow soon after, loosely overlapped by Shinryu's Central Slam - a direct attack on the central tile that must be avoided.
- Akh Morn, a vicious tank-buster that requires both tanks to share damage via heavy mitigation cooldowns. Alternatively, a lone tank can utilize an immunity cooldown instead. This ability will overlap with Akh Rhal.
- Akh Rhal will target the ground beneath a random damage dealer and blast that location with vicious AoE damage after a brief delay. All players must move away from the affected area if they wish to avoid major damage.
- At this point, Shinryu will prepare to cast one of two ultimate abilities once the Corrupted Aether Gauge has been filled - Hellfire or Judgement Bolt. Regardless of which attack is chosen, it will overlap with another Summon Icicle, so watch out!
- Hellfire (Ultimate), like Hypernova, requires players to utilize a water puddle in order to acquire Fire Resistance Up and absorb the damage (whilst simultaneously avoiding Summon Icicle).
- Judgement Bolt (Ultimate), being lightning-based, requires players to avoid both the water puddles and summoned icicles simultaneously. In addition, the 1-4 players hit by Judgement Bolt will be afflicted with a dispellable paralysis debuff that should be removed as soon as possible.
- Bear in mind that either ultimate will cleanse the platform of all remaining water puddles.
- Tail Slam will now mark a random damage-dealer instead of a healer, but is dealt with the same way as before. Be sure you place it so that the tail collides with at least one undamaged platform (preferably the centre if it is undamaged), allowing the raid to counter-attack the tail and potentially destroy it for major damage to Shinryu. Much like before, the Tail Slam will be loosely overlapped by Levin Bolt, meaning players should be ready to spread out and avoid clipping each other with AoE lightning damage, which is then followed by another Ice Storm (unavoidable AoE damage).
- The Worm's Heart will once again regenerate, pressuring the group with another DPS check. Make sure the heart is destroyed before the Corrupted Aether Gauge reaches full!
- Burning Chains, unlike before, will now tether all healers and tanks - but not damage dealers. Despite this, the chains are dealt with in the exact same manner - moving in opposite directions to stretch them out until they break.
- Earth Breath will mark one healer and one damage dealer with a noticeable marker. After a brief delay, Shinryu will blast both of the marked players with an AoE attack. Those marked by Earth Breath should position themselves so that the following AoE attack does not hit other members of the raid.
- Akh Morn and Akh Rhal will follow shortly and is dealt with in the same manner as before. However, bear in mind that the Akh-combo will be overlapped with another Ice Storm (unavoidable AoE damage) which may prove fatal for anyone on low health.
- Diamond Dust (Ultimate) will blanket all remaining tiles in ice, causing anyone who moves to slide a sizeable distance in the direction they moved in. To make matters worse, both Healers will be tethered by Burning Chains, forcing them to slide in opposite directions to break the chains as soon as possible without sliding off the platform to their doom. Due to being an ice ultimate, Diamond Dust will form new water puddles around the platform.
- Reiru (4x Adds) will now be summoned around the platform and tether themselves to an individual player. Each add must be healed to full (rather than destroyed) in order to defeat them. Failure to do so will cause each unhealed add to crash down upon the tethered target and inflict raid-wide damage and debuffs. During this time, a tank will be marked for another Tail Slam. If all is going well, there should be one undamaged tile remaining, so be sure to bait the slam so that the tail lands on the undamaged tile - giving the raid another opportunity to destroy the tail and inflict bonus damage to Shinryu.
- The Worm's Heart will regenerate once more, providing another DPS check before the next ultimate attack. Simultaneously, participants must deal with another Akh Morn & Akh Rhal combo, along with Summoned Icicles.
- Aerial Blast (Ultimate) will conjure a whirling tornado on the central tile that will regularly knock players away from the centre. After a few minor pushbacks, players will be hit by a final blast which will knock players away by a greater distance, so be sure to position yourself so that you aren't knocked over the edge of the platform. Bear in mind that Aerial Blast will be loosely overlapped by Burning Chains on random damage dealers who may need to utilize the knockback to break their chains, or be ready to do so as soon as possible once Aerial Blast has finished.
- Earth Breath will once again mark a healer a damage dealer, forcing them to move away so that the rest of the raid isn't clipped by upcoming AoE damage. This will be overlapped by yet another Icestorm (unavoidable AoE), so be ready to shield or heal upcoming damage.
- Divebomb will cause Shinryu to fly to a corner of the arena and prepare to swoop across it in a diagonal line, forcing players to move to an adjacent tile to avoid being caught in its path. Unlike normal mode, this mechanic will not come with an obvious telegraph. Once complete, Shinryu will land once more, possibly at a different side of the arena.
- NOTE: At this point, Shinryu will cycle through familiar mechanics until it is brought down to 44% health or lower, resulting in a transition to Phase 2.
Transition
Just like normal mode, all players will be bound before an Active Time Manoeuvre takes place. Assuming you successfully free yourself, players will be transported to a new area, whereas those who failed will be instantly killed.
Phase 2
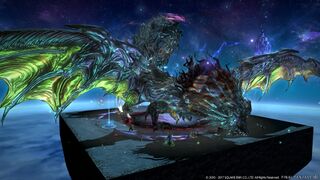
The new phase begins with Touchdown, a proximity-based landing from Shinryu that will inflict damage and a massive knockback. The entire raid should immediately rush to the north of the platform so that the resulting knockback successfully launches them to another tile in the distance. Upon landing, players must continue moving north to avoid damage from more proximity markers around the rest of the arena, each of which will drop a meteor-like egg that hatches into multiple adds - one large add and four smaller ones. Bear in mind that the larger adds are capable of casting Death Sentence, which should be interrupted whenever possible.
After a brief delay, more proximity markers will indicate the arrival of even more adds - this time, two large adds and three smaller ones.
Finally, five random players will be marked via massive AoE markers, forcing the raid to spread out to avoid unnecessary damage. After a brief delay, these markers will become the location for one final wave of proximity markers that will drop more add-spawning meteors, resulting in five small adds.
During the entire add phase, Shinryu will be gathering more Corrupted Aether. If Shinryu accumulates 100 aether before the add phase is completed, the raid will suffer a wipe.
- Protostar will inflict massive raid-wide damage if the group successfully defeated all adds before the aether gauge was filled.
- Tail Spit follows, marking the centre of the arena with a shimmering blue marker. After a brief delay, Shinryu will smash its tail into the marker, knocking everyone backwards. Players must move close to (but not inside) the marker in a way where they will be knocked to a diagonal corner of the arena, as being knocked to the sides will likely result in falling over the edge. All players who survive the knockback can now walk across Shinryu's tail to the first platform. However, Shinryu will pepper the raid with laser beams as they attempt to cross the void, so be careful!
- Players who managed to cross the void onto Shinryu's platform will notice a Doom Puddle within its hitbox. This pulsating puddle of darkness will inflict doom on anyone who stands within it. Should a player remain in the puddle for ten seconds, they will immediately perish. For the following mechanics, players should group up in front of Shinryu.
- Tera Slash is a vicious tank buster that will inflict Physical Vulnerability Up against the target. As a result, tanks should co-ordinate a tank-swap while it is being cast.
- Burning Chains will afflict every member of the group, forcing tethered players to move in opposite directions in order to break them.
- Atomic Ray - a sharable damage & debuff AoE - will loosely overlap Burning Chains. Unlike regular stack markers, Atomic Ray is a staggered attack that will inflict Magic Vulnerability Up to anyone caught in the blast, preventing the entire raid from stacking up into a single group. Instead, all players should split up into pairs as soon as the Burning Chains have been broken. This will help to prevent multiple applications of vulnerability being multi-stacked on the entire group.
- Shinryu will now combo Icestorm with one of two additional mechanics - Hypernova or Levinbolt. Bear in mind that during this phase, Icestorm will freeze any player who is not moving when it has been cast. This needs to be avoided (or allowed) depending on the mechanic that will overlap with Icestorm.
- Levinbolt - a delayed blast of lightning that will affect the area that each player was standing in when the cast has been completed. In short, once Levinbolt has been cast, players must move away from where they were standing at the time. Due to the overlapping Icestorm, players can deal with this combo by standing together near the boss (to bait Levinbolts into a predictable area), moving on the spot to avoid being frozen by Icestorm, then moving around the boss (preferably away from each other) to avoid the oncoming Levinbolt damage in the baited area.
- Hypernova - a delayed blast of sharable fire damage. Without protection, the damage is particularly vicious, hence players should stack together and allow Icestorm to freeze the entire group together, giving them some much-needed fire resistance. On doing so, the group will share the damage and eventually be thawed out of the ice by the resulting fire damage-over-time. Once released, Healers should be ready to top up the group as soon as possible.
- Shinryu will follow-up on the previous combo with one of two abilities: Benightning Breath or Wyrmwall. Benightning Breath is a large frontal AoE with a bright purple telegraph that can cover a sizeable portion of the arena. Anyone unlucky enough to be caught in the following blast will take immense damage and also receive an Infirmity debuff. By comparison, Wyrmwall is an arena-wide attack with only one safe spot inside Shinryu's hitbox. Due to this area being covered by the Doom Puddle, players who linger too long within the safe spot (10 seconds) will undoubtedly be slain outright by doom.
- Tera Slash - the vicious tank buster that applies Physical Vulnerability Up - will be executed straight after the above combo, thus both tanks need to be ready to swap as it is being cast.
- Reiru (4x Adds) will once again be summoned around the platform and are dealt in the same manner as they were in Phase 1. They cannot be killed, only healed, and any add not healed to maximum health in time will unleash unwanted damage and debuffs. While the Healers handle this mechanic, the rest of the group should take the opportunity to inflict as much damage to Shinryu as possible between other mechanics.
- Tera Slash will be used once again, forcing another tank-swap.
- Burning Chains will once again overlap with Atomic Ray, forcing the group to break their chains, preferably in pairs so that they can appropriately absorb Atomic Ray without clipping or applying debuffs to anyone else around them.
- Benightning Breath or Wyrmwall follows once more, both of which are dealt with in the same manner as before, completing what will eventually become a mechanical loop until Shinryu has been reduced down to <25% health.
- When Shinryu reaches 22% HP remaining, it will cease attacking and slowly begin casting Tidal Wave, a hard enrage. As soon as it begins, small launch markers will appear on the platform that allows players to leap up onto Shinryu's back. While there, players can now target Shinryu's right and left wings, both of which will be also be long-casting a hard enrage ability, Hellfire and Judgement Bolt, respectively. Though defeating Shinyru will automatically end the fight, there is astronomically little chance of accomplishing this before one of the wings finishes casting their enrage, so the wings must be both defeated not only to stop their casts, but to also deal signifigant damage to Shinyru. Once both wings are dispatched, quickly DPS down Shinyru's remianing health before Tidal Wave goes off, and the trial will be over.
Loot
- See also: Shinryu's Weapons
- Each player will receive 1 Shinryu Totem per kill. Collect 10 totems to exchange for a weapon or 99 for a Legendary Kamuy Fife at Eschina in Rhalgr's Reach (X:13.8 Y:11.8).
- Shinryu Card (Drops at a fixed rate.)
 Treasure Coffer
| Name | Type | Item Level | Rarity | Quantity |
|---|---|---|---|---|
| Shinryu's Paladin Arms (IL 335) | Other | N/A | Blue | 1 |
| Shinryu's War Axe | Marauder's Arm | 335 | Blue | 1 |
| Shinryu's Greatsword | Dark Knight's Arm | 335 | Blue | 1 |
| Shinryu's Gunblade | Gunbreaker's Arm | 335 | Blue | 1 |
| Shinryu's Lance | Lancer's Arm | 335 | Blue | 1 |
| Shinryu's Claws | Pugilist's Arm | 335 | Blue | 1 |
| Shinryu's Katana | Samurai's Arm | 335 | Blue | 1 |
| Shinryu's Daggers | Rogue's Arm | 335 | Blue | 1 |
| Shinryu's Greatbow | Archer's Arm | 335 | Blue | 1 |
| Shinryu's Revolver | Machinist's Arm | 335 | Blue | 1 |
| Shinryu's Chakrams | Dancer's Arm | 335 | Blue | 1 |
| Shinryu's Rod | Two-handed Thaumaturge's Arm | 335 | Blue | 1 |
| Shinryu's Grimoire | Arcanist's Grimoire | 335 | Blue | 1 |
| Shinryu's Rapier | Red Mage's Arm | 335 | Blue | 1 |
| Shinryu's Cane | Two-handed Conjurer's Arm | 335 | Blue | 1 |
| Shinryu's Codex | Scholar's Arm | 335 | Blue | 1 |
| Shinryu's Ephemeris | Astrologian's Arm | 335 | Blue | 1 |
| Shinryu's Scale | Material | N/A | Basic | 1 |
| Shinryu Weapon Coffer (IL 335) | Other | N/A | Basic | 1 |
| Legendary Kamuy Fife | Other | N/A | Basic | 1 |
| Faded Copy of The Worm's Tail | Orchestrion Roll | N/A | Basic | 1 |
Achievements
This duty is associated with the following achievements:
| Name | Points | Task | Reward | Patch |
|---|---|---|---|---|
| How to Slay Your Dragon 2 | 10 | Defeat Shinryu in the Minstrel's Ballad: Shinryu's Domain. | - | 4.1 |
| Mightier than the Worm | 5 | Complete the Minstrel's Ballad: Shinryu's Domain with a party of only blue mages, Silence Echo turned on, and Unrestricted Party turned off. | - | 5.45 |


