User:Boblers/sandbox

From Final Fantasy XIV Online Wiki
< User:Boblers
Revision as of 19:56, 30 August 2024 by Boblers (talk | contribs) (testing marker page idea)
Jump to navigation Jump to search

Markers

Circle AoE

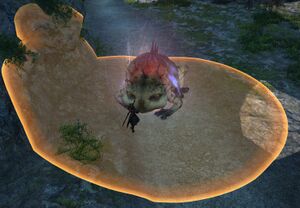
A common Circle AoE.

A Circle AoE, more commonly referred to as just an AoE, is a common Area of Effect marker that indicates the area an attack will cover. Anything within the AoE by the time the enemies' attack finishes casting will take damage. This type of AoE can range from very small to the width of the arena, and may be telegraphed or untelegraphed. To avoid taking damage, players simply need to move out of the telegraphed hitbox by the time the enemy finishes casting it.

Proximity AoE

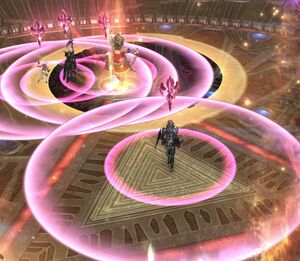
A proximity AoE dropped at the edge of an arena.

A Proximity AoE is a marker that indicates where an attack will soon land. This type of AoE will pulsate from its center with a large ring, indicating that anything close to the marked point will take heavy, oftentimes fatal damage. As the pulsating rings move further out, they become fainter and fainter, indicating that the further away players are, the less damage they will take (generally exponentially less). These can appear individually, or in groups, requiring players to locate a safe location to avoid multiple attacks. To avoid damage, players need to simply move as far away from the center of the AoE as possible.

AoE marker

Players marked with AoEs.

An AoE Marker, commonly referred to as a Spread Marker, is an Area of Effect that targets a player and tracks their movement, and will explode shortly afterwards, affecting anyone within the highlighted area. This marker is generally used in conjunction with other mechanics, such as requiring players to spread out in a limited safe zone. The player marked will take damage, but if they move away from the party, they can spare others additional damage.

Stack marker

Stack marker

A stack marker splits the damage between everyone within the marker. If nobody stacks to share the damage, it will usually kill the target.

It's recommended to place it close to the boss so everyone can share the damage easily.

Materiel CratePossible Yielded Item(s)

Mounts

Item Original source
Dodo horn icon1.png  Dodo Horn Deep Dungeons Random drop from Platinum-haloed sack icon1.png  Platinum-haloed Sacks received on floors 71-100 of Deep Dungeon Heaven-on-High.
Eldthurs horn icon1.png  Eldthurs Horn Field Operations Random drop from Gold Coffers in The Forbidden Land Eureka The Forbidden Land, Eureka Pyros.
Eurekan petrel horn icon1.png  Eurekan Petrel Horn Field Operations Random drop from Gold Coffers in The Forbidden Land Eureka The Forbidden Land, Eureka Hydatos.
Flying chair icon3.png  Flying Chair Crafting (Alchemist) Crafted by an Alchemist frame icon.png Alchemist Level 70★★ with Master Alchemist V. Requires 8 Cloudsbreath icon1.png  Cloudsbreaths, 1 Riviera armchair icon1.png  Riviera Armchair.

Minions

Item Original source
Abroader otter icon2.png  Abroader Otter Subaquatic Voyages Collected from Deep-sea Site 7, Nald'thal's Pipe, Sea of Ash 2, Sea of Ash 3, The Isle of Sacrament
Aurelia polyp icon2.png  Aurelia Polyp Subaquatic Voyages Collected from Deep-sea Site 3, Deep-sea Site 5, Glutton's Belly, Purgatory, Sea of Jade 1, The Anthemoessa Undertow, The Blue Hole, The Cobalt Shoals, The Umbrella Narrow, The Upwell.
Axolotl eft icon2.png  Axolotl Eft Retainer Ventures Obtained from Waterside Exploration XXII and Quick Exploration (Fisher frame icon.png Fisher).
Bombfish icon2.png  Bombfish Dungeons Randomly dropped in the final chest of the level 63 dungeon Dungeon Shisui of the Violet Tides
Bom boko icon2.png  Bom Boko Retainer Ventures Acquired from Field Exploration XX.
Byakko cub icon2.png  Byakko Cub Crafting (Weaver) Crafted by Level 70★★★ Weaver frame icon.png Weaver. Requires Master weaver vi icon1.png  Master Weaver VI.
Capybara pup icon2.png  Capybara Pup Treasure Hunt Obtained from Timeworn gazelleskin map icon1.png  Timeworn Gazelleskin Map
Castaway chocobo chick icon2.png  Castaway Chocobo Chick Gathering (Fisher) Gathered by Fisher frame icon.png Fisher at level 50 Fishing hole North Isle of Endless Summer in Eastern La Noscea (x36,y26) by double Mooch.png  Mooch from Merlthor goby icon1.png  Merlthor Goby to Wahoo icon1.png  Wahoo.
Conditional virtue icon2.png  Conditional Virtue Dungeons Found in a chest in The Forbidden Land Eureka The Baldesion Arsenal in The Forbidden Land Eureka The Forbidden Land, Eureka Hydatos.
Copycat bulb icon2.png  Copycat Bulb FATE Reward Drops randomly from Gold Happy Bunny boxes in The Forbidden Land Eureka The Forbidden Land, Eureka Pagos.
Dhalmel calf icon2.png  Dhalmel Calf FATE Reward Drops randomly from Pyros lockbox icon1.png  Pyros Lockbox from FATEs in The Forbidden Land Eureka The Forbidden Land, Eureka Pyros.
Dress-up yugiri icon2.png  Dress-up Yugiri
Ghido icon2.png  Ghido
Hedgehoglet icon2.png  Hedgehoglet
Ivon coeurlfist doll icon2.png  Ivon Coeurlfist Doll
Koala joey icon2.png  Koala Joey
Magitek avenger f1 icon2.png  Magitek Avenger F1
Mameshiba icon2.png  Mameshiba
Mock-up grynewaht icon2.png  Mock-up Grynewaht
Monkey king icon2.png  Monkey King
Mudpie icon2.png  Mudpie
Odder otter icon2.png  Odder Otter
Private moai icon2.png  Private Moai
Road sparrow icon2.png  Road Sparrow
Salt & pepper seal icon2.png  Salt & Pepper Seal
Scarlet peacock icon2.png  Scarlet Peacock
Seitei icon2.png  Seitei
Tengu doll icon2.png  Tengu Doll
The gold whisker icon2.png  The Gold Whisker
The prince of anemos icon2.png  The Prince of Anemos
Tiny tatsunoko icon2.png  Tiny Tatsunoko
White whittret icon2.png  White Whittret
Wind-up bismarck icon2.png  Wind-up Bismarck
Wind-up chimera icon2.png  Wind-up Chimera
Wind-up elvaan icon2.png  Wind-up Elvaan
Wind-up fafnir icon2.png  Wind-up Fafnir
Wind-up hien icon2.png  Wind-up Hien
Wind-up khloe icon2.png  Wind-up Khloe
Wind-up lakshmi icon2.png  Wind-up Lakshmi
Wind-up magnai icon2.png  Wind-up Magnai
Wind-up matanga icon2.png  Wind-up Matanga
Wind-up mithra icon2.png  Wind-up Mithra
Wind-up namazu icon2.png  Wind-up Namazu
Wind-up ravana icon2.png  Wind-up Ravana
Wind-up sadu icon2.png  Wind-up Sadu
Wind-up shinryu icon2.png  Wind-up Shinryu
Wind-up susano icon2.png  Wind-up Susano
Wind-up tarutaru icon2.png  Wind-up Tarutaru
Wind-up weapon icon2.png  Wind-up Weapon
Wind-up zhloe icon2.png  Wind-up Zhloe
Yukinko snowflake icon2.png  Yukinko Snowflake