Labyrinth of the Ancients
- Main article: Crystal Tower
Labyrinth of the Ancients is the first section of Crystal Tower released in patch 2.1. It requires a full raid of 24 players. It features 4 bosses Bone Dragon, Thanatos, King Behemoth and Acheron and many sets of trash. Players will receive iLevel 80 gear from the boss drops.
- Players can start the questline by talking to Outlandish Man at Mor Dhona (x21,y8) then start the quest Legacy of Allag.
- Players will receive 50 Tomestones of Mythology and 200 Tomestones of Philosophy for completing the Labyrinth of Ancients.
Bosses and Trash Mobs
Bone Dragon
Bone Dragon is the 1st boss of the Labyrinth of the Ancients. Players will encounter the Dragon when they take the left path from the entrance. Bone Dragon must be killed 3 times before it is finally defeated.
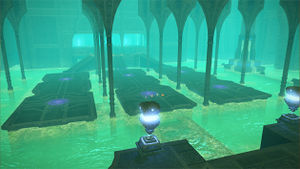
The arena has platforms similar to previous rooms. Poison will occasionally fill all lower areas of the room so be aware of this. The boss will spawn 3 waves of skeleton adds. Each group should stand in a separate side of the room and pull one add to the outside of the room on a platform. Each add must be killed on a separate platform. Once the bone dragon dies, all skeleton adds will respawn and move towards the dragon. If two skeletons were close to each other when they died, they will move too fast to be killed. Each skeleton that reaches the boss will do 1500 unblockable damage to the raid. This phase will repeat once. The second time the dragon comes back to life, he will spawn floating eyes instead. These should be picked up by tanks but dps should focusing on killing boss instead of adds then the dragon will die for good this time.
- Kill skeletons on different platforms, kill skeletons before they reach dragon.
- Pick the floating eyes, leave them with tank only
Atomos
The raid will need to divide into their 3 groups: 1 for each path. 2 healers and 2 ranged DPS need to stand on the colored platform, (4 people total). The boss does not need to be tanked but will continuously spawn adds. The tanks need to position these adds within range of the DPS on the platforms. The remaining 2 DPS kill the boss.
- 4 people stand on each colored platform. They should DPS adds and heal tanks. Turn off tank mode/shield oath when tanking boss, WRR should tank boss while PLD tank adds, otherwise, higher HP tank adds
Thanatos
Thanatos is the 2rd boss of the dungeon. Players will encounter the boss when they take the right path from the labyrinth entrance.
Thanatos is a ghostly iron giant that is surrounded by three Magic Pots on the corner of his chamber. The Magic Pots are friendly mobs, and must be protected and healed throughout the fight, as they will enable you to damage the boss. If all three die, then you will be unable to harm the boss and will wipe.
Thanatos is “ghostly” and cannot be harmed ordinarily. At the beginning of the fight, one of the Magic Pots will shoot green lines out to several alliance members, giving them an “Intangible”(?) debuff. The first group to receive buff is always A (note: C pot buff A, A buff B and B buff C). This debuff allows you to deal damage to the boss. A tank with the debuff should pick up the boss immediately, and a tank swap should occur whenever a tank picks up the debuff and the one on the boss loses it. Thanatos does have a cleave, so he should be faced away from the group and the pots -- against the wall halfway between two pots is a good spot.
Anyone not having that debuff should focus on killing the adds that spawn throughout the fight. They will charge the Pots and attack, and occasionally will have a red line connecting them to a pot. Anytime you see this, these adds must be killed immediately. While that red line is active, Thanatos will be pulling the Pot to himself with a giant Holmgang chain -- if he gets it to him, he will kill it pretty fast. Once the adds connected to the Pot die, it can escape back to its safe spot.
This fight progresses fairly straightforwardly from here, just repeating the basic mechanics until he dies or all three Pots die.
Once Thanatos is dead, grab your loot and head for the teleporter to go on to the next path.
- If you're a ghost (invisible), DPS the boss. If you're visible, kill adds. Healers should keep the pots alive
Allagan Bomb
Allagan Bomb initially does nothing. Each group takes one of the large sword adds. Those Vassagos WILL NOT aggro anyone automatically, so MT should stand in front of each adds to avoid the boss running to the middle. The boss will periodically spawn balloon adds that need to be killed before they explode (high priority). In addition, a Napalm add may spawn and will have the highest priority to kill. The boss can be damaged once the 3 adds are down.
- MT should stand in front of Vassago before starting fight
- Kill Priority for adds: Napalm first, Balloon second and Sword third.
King Behemoth
King Behemoth is the 3rd boss of the labyrinth. Players will encounter Behemoth when they take the center path from the entrance.
Off tanks go to towers; DPS priority is Iron Giant/Moving adds, and then boss. King behemoth will target a few players with a comet (green mark above head). These players need to run to the center and drop the comet to be used later. Adds will continually spawn and attempt to reach the towers. These need to be killed asap. In addition, an iron giant will spawn that will try to destroy the comets. The giant needs to be killed before all comets are destroyed or you will wipe. When King Behemoth stands up, he is casting meteor. The entire raid needs to drop what they're doing and get behind a comet (put a comet between you and him). Rinse and repeat and the fight is done.
Acheron
Acheron is the final boss of Labyrinth of the Ancients. The boss room is unlocked from defeating the other 3 bosses.
Acheron has only 1 big move to watch out for. The fight will start off slow and get you used to the visuals for his AoEs. A short while later, 3 adds will spawn and target a player to stun. each group should take a position ahead of time (A on the left, B center, C on the right) and kill the closest iron hand add. Once the add is down, each group needs to move to their corresponding circle (3 large circles on the outside of the arena). Doing this will put up a barrier to block his flare attack (flare will instantly kill you). Immediately after the flare, an iron golem will spawn for each group and must be picked up quickly by each tank. As the fight progresses the AoEs will become larger and harder to dodge. In addition, I was told that another iron hand will spawn if someone gets hit by the green AoE (confirm?). At 50% he will spawn another 3 iron hands and you need to repeat the above process to live. Once you've completely that, burn him down and enjoy your loot.
- Kill iron hands then have each group stand on once of the circles the adds spawned from.
Loot
- Main article: Crystal Tower Loot


