Aglaia
Aglaia
- Level
- 90
- Item Level
- 565
- Difficulty
- Normal
- Party size
- Alliance
24 man • 3 6
6  15
15 
- Unsyncing
- Allowed
- Time limit
- 120 minutes
- Tomestones
- Req. quest
 The Realm of the Gods
- Patch
- 6.1
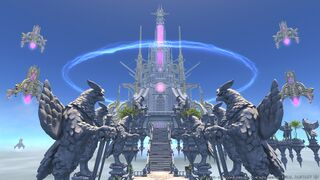
“In the course of investigating the legendary phantom realm on behalf of the Students of Baldesion, you have encountered four mysterious beings who claim to be of the Twelve, the guardian deities of Eorzean myth. They declare that, in Hydaelyn's absence, they are the rightful rulers of the star, and you must prove your strength if mankind is to remain the master of his own destiny. While you know precious little about these self-proclaimed divinities, the potential threat they pose cannot be denied. So it is that you resolve to answer their challenge, and prepare for a foray into their sanctum...
— In-game description
Aglaia is a level 90 raid introduced in patch 6.1 with Endwalker.
It is the first part of Myths of the Realm.
Objectives
- Clear Ingenuity's Foothold: 0/1
- Clear the Path: 0/1
Bosses
 Byregot
- Byregot's Ward: Tankbuster.
- Ordeal of Thunder: Unavoidable raidwide damage.
- Byregot's Strike: Knockback from a random point around the middle of the arena.
- Builder's Build: This attack is combined with Byregot's Strike. Around Byregot will sprout 4 thin conal AoEs. They will not start from the boss's current position but will be translated into the center of the Byregot's Strike's knockback circle.
The boss will then transition into a different arena, knocking out two sides and replacing the floor with blocks. Hammers will then appear next to the blocks, which will knock the blocks 1 tile to the side after a few seconds. Anyone whose blocks slide beneath their feet will fall to their death.
- ???: A purple hammer will appear on a single tile. This hammer will create a line AoE in a long column, and can be pushed if the row it is on has a hammer on it. Players must predict the movement of the purple hammer while making sure not to have the ground fall beneath their feet to another hammer.
- Byregot's Spire: Byregot will jump to one side and start casting a massive line AoE in the center 3 columns. Meanwhile, hammers appear on the outside to push the blocks just before the cast goes off. Players must predict where the blocks will be knocked by avoiding the center 3 columns and standing on a row in the center that will be knocked to another side and standing in the freshly made safe area.
- Reproduce: Byregot will split up into 5 clones of himself placed on the longer wall, which each cast Cloud to Ground, a circle AoE that will travel in a line down the arena. Some of the clones will have lightning surrounding them, meaning that their AoEs will travel faster than the ones that do not have lightning.
 Rhalgr's Emissary
- Destructive Strike: Cleave tankbuster.
- Bolts from the Blue: Unavoidable raidwide damage.
- Destructive Static: The boss will hold its axe along one shoulder and cleave the other half of the arena.
- Lightning Bolt: Two bolts of lightning will come out from the boss and draw a line to the wall, turn 90 degrees, and back again. Any players caught in the drawn area will be hit with heavy damage. After the attack, puddles will appear on random players.
- Boltloop: Two circle AoEs will appear on opposite sides of the arena, followed by an expanding donut AoE.
 Rhalgr
- Lightning Reign: Unavoidable raidwide damage.
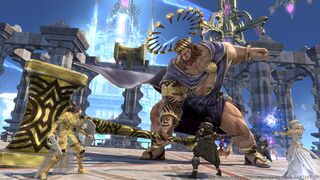
- Advent of the Eighth: Two colored portals will appear, splitting the arena in two. Rhalgr will pull back one of his hands, casting Hand of the Destroyer and preparing to punch one colored portal, hitting the same colored half with a massive fist AoE.
- Broken World: A flare comet will appear on the bottom of the hand. If this is casted in addition to Advent of the Eighth, the mechanics will change. If Rhalgr is punching the portal next to the comet, he will break the comet into pieces and spread the flare marker across the fingers of the hand, leaving the only safe zone directly under the comet. Otherwise, the hand will punch half of the arena and the flare marker will resolve as normal, followed by an unavoidable circle AoE on random players.
- Rhalgr's Beacon: A knockback circle will appear in the center of the arena, as well as 5 green arrow lines indicating where you will be knocked back. Players must make sure they position on a line that goes up one of the fingers, as they will stop the knockback.
- Hell of Lightning Places purple lightning orbs on some of the fingers, which should be avoided when deciding where to be knocked back into.
- Bronze Work: Two sets of thin conal AoEs will appear from the boss. Stand in the second cone AoE and then move out of it when the first one goes off.
 Lion of Aglaia and Lioness of Aglaia
- Double Immolation: Unavoidable raidwide damage.
- Slash and Burn: One lion will be marked with a donut AoE while the other will be marked with a circle AoE. The dots above them show the order in which the mechanics resolve.
- Roaring Blaze: The two lions will each mark half of the arena in front of them with an AoE. The dots above them show the order in which they resolve.
When a lion is killed, the mechanics will simplify.
- Roaring Blaze: Cleaves half of the arena.
- Trial by Fire: Circle AoE in the center of the arena.
 Azeyma
- Warden's Warmth: Three tankbusters.
- Warden's Prominence: Unavoidable raidwide damage.
- Solar Wings: Two wide cones to the boss's flanks, along with 6 fiery orbs where the AoE hit that explode after some time. Sometimes, clones will appear and the boss will cast Haute Air, kicking the orbs in the direction that the clones are facing. Players must predict the trajectory of the orbs to not get hit by a stray orb.
- Solar Fans: Two fans will start from the boss and move to opposite walls with a line AoE trailing behind them.
- Radiant Rhythm: The fans will repeatedly move 90 degrees around the edge of the arena.
- Radiant Finish: Both fans will explode in two massive circle AoEs.
- Solar Fold: The arena will be divided into four quadrants with bars of flame.
- Fleeting Spark: A large 270 degree cleave to the boss' front and flanks.
- Sun's Shine: Clones will appear on the edge of the arena. After a while, the clones will blow the fire into the quadrant after the wind passes a bar of fire. Note that this does not affect the quadrant directly in front of it.
- Wildfire Ward: A large portion of the arena will be covered in flame, leaving only a triangle in the center safe. Three knockback lines will then appear in sequence. Players must memorize the sequence that they appear in and position themselves in the center or else they will be knocked into the fire.
- Noble Dawn: A flaming ball will appear in the center and highlight random areas for fiery circle puddles, which then expand into a medium circle AoE.
- Sublime Sunset: Azeyma positions herself to kick the flaming ball into one side of the map, placing a flare AoE at where it will be kicked to.
 Nald'thal
- Golden Tenet: Split tankbuster, which can be shared with 3 tanks or invulned.
- As Above, So Below: Unavoidable raidwide damage.
- Hells' Trial: Stronger unavoidable raidwide damage.
- Heat Above, Flames Below: The ground will be marked with orange and blue, and four indicators will start floating around the boss. The color of indicator will correspond with the area that is attacked.
- Heavens' Trial: Three unavoidable conal AoEs on 3 random players and a stack marker.
- Far Above, Deep Below: Three following AoEs on 3 random players and a line stack marker.
- Once Above, Ever Below: Two colored moving AoEs will appear on the ground, and four indicators will start floating around the boss. The color of the indicator will go off, and the opposite will not go off. Players should position in between the color that is not shown, as the moving AoEs will hit the other three quadrants.
- Hell of Fire: Half of the arena will be lit with purple lasers and will be cleaved. Sometimes, the lasers will turn around and hit the other side of the arena.
- Wayward Soul: Large balls will fall from the sky, leaving a large circle AoE where they fall. This ends with a section where the balls fall in a spiral and players must move in a circle around the boss.
- Fired Up: Several positions on the arena will be marked with diamonds indicating the order they will go off as well as circular indicator above them. If the indicator is a blue dot, a circle AoE will appear at its position. If the indicator is a yellow dot with arrows expanding arrows, a knockback will appear at its position. The boss will release the indicators after casting Fortune's Flux.
- Soul's Measure: The boss will create 3 adds and tether each alliance to them, and the adds will take on the appearance of a random party member.
- Twingaze: A thin cone AoE targeting a random player.
- Magmatic Spell: Three stack markers that should be taken separately by each alliance.
- Balance: Nald'thal measures the weight of your souls, as well as the souls of the adds you killed. The arena is split in half, and players must work together to keep the scale balanced. Each player counts as 1 weight and each dead add counts as 8 weight. If the scales are unbalanced at all, the alliance will be wiped.
Loot
 ?????
?????
No item drops found that match the constraints of the query.
 ?????
?????
No item drops found that match the constraints of the query.
 ?????
?????
No item drops found that match the constraints of the query.
 ?????
?????
 40 Allagan Tomestone of Aphorism
 20 Allagan Tomestone of Astronomy
- Aglaia Coin (Drops at a fixed rate)
No item drops found that match the constraints of the query.
| Name | Type | Item Level | Rarity | Quantity |
|---|---|---|---|---|
| Wind-up Azeyma | Minion | N/A | Basic | 1 |
| Pilgrimage Orchestrion Roll | Orchestrion Roll | N/A | Basic | 1 |
| Radiance Orchestrion Roll | Orchestrion Roll | N/A | Basic | 1 |
| In the Balance Orchestrion Roll | Orchestrion Roll | N/A | Basic | 1 |
| Nald Card | Triple Triad Card | N/A | 1 |
Rewards
You can receive only one reward item per week for completing duties in Aglaia. In the event you are awarded an item from the loot list, you relinquish your right to vie for all remaining items regardless of whether you selected Need or Greed.
- Reward eligibility is reset every Tuesday at 1:00 a.m. (PDT)
Each party in the alliance will receive its own treasure chest, the contents of which will be identical regardless of the route taken.
- Players cannot open a treasure chest belonging to another party.
Completion Reward
Upon completing Aglaia, players can also earn a separate reward once per week: two Cracked Anthoclusters and one Aglaia Coin. The Aglaia Coin can be exchanged with Nesvaaz in Radz-at-Han (X:10.6 Y:10.0) for items used to enhance equipment purchased with ![]() Allagan Tomestone of Astronomy.
Allagan Tomestone of Astronomy.


